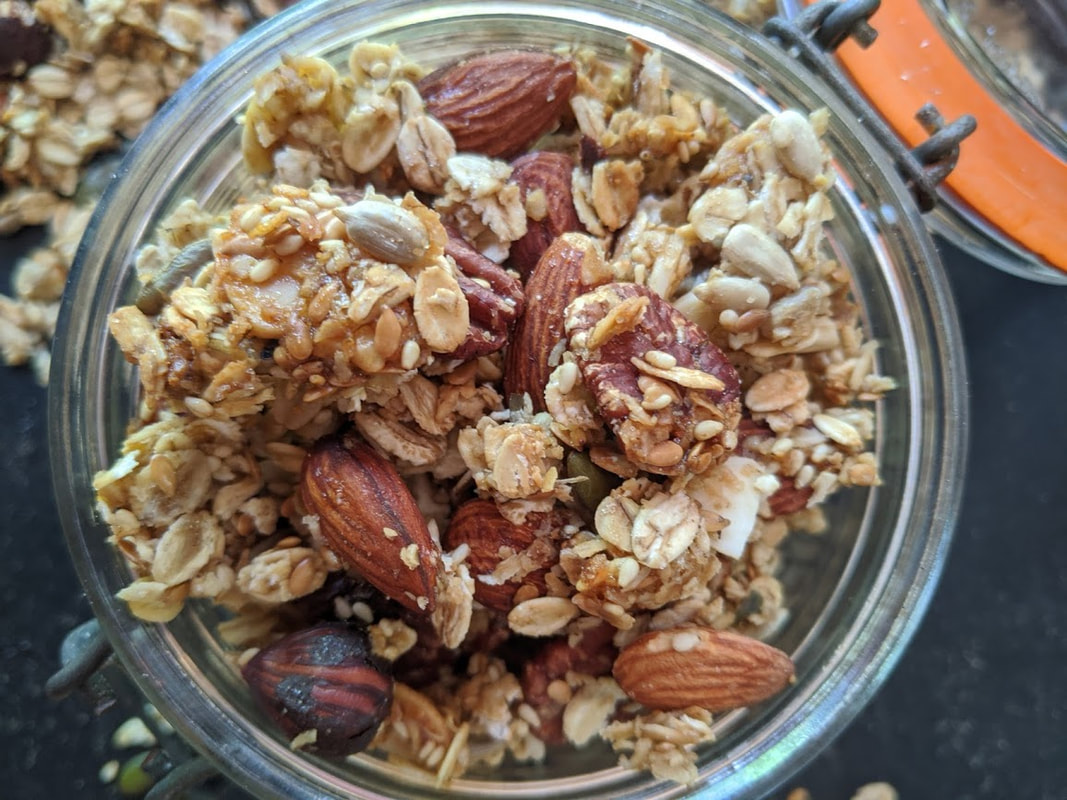
 White Cottage Granola (makes 1 large jar) I’m a huge fan of granola but I'm really quite fussy. I like it to be nutty, have no fruit (I’ll add that fresh) and be not too sweet. It’s hard to find one that’s just right. The great thing about making your own is that you can hone the recipe to suit your own tastes - a little more honey or maple syrup if you have a sweet tooth and you can add your own particular favourite mix of seeds and nuts. Similarly, if you’re a fan of dried fruit, you can add 100g dried fruit such as raisins, apricots, dates or sultanas. And it just couldn't be simpler. You'll wonder why you haven't made it before. Ingredients Mixed rolled grains, eg oats, wheat, barley, spelt or rye* 250g Mixed seeds, eg pumpkin, sunflower, sesame, flax 125g Mixed nuts, eg pecan, brazil, hazelnuts, whole or flaked almonds 125g Light brown sugar 30g Runny honey 50g Light vegetable oil, 30g *If you only have oats, it’s fine to use just oats but try to use a jumbo or large flake version.
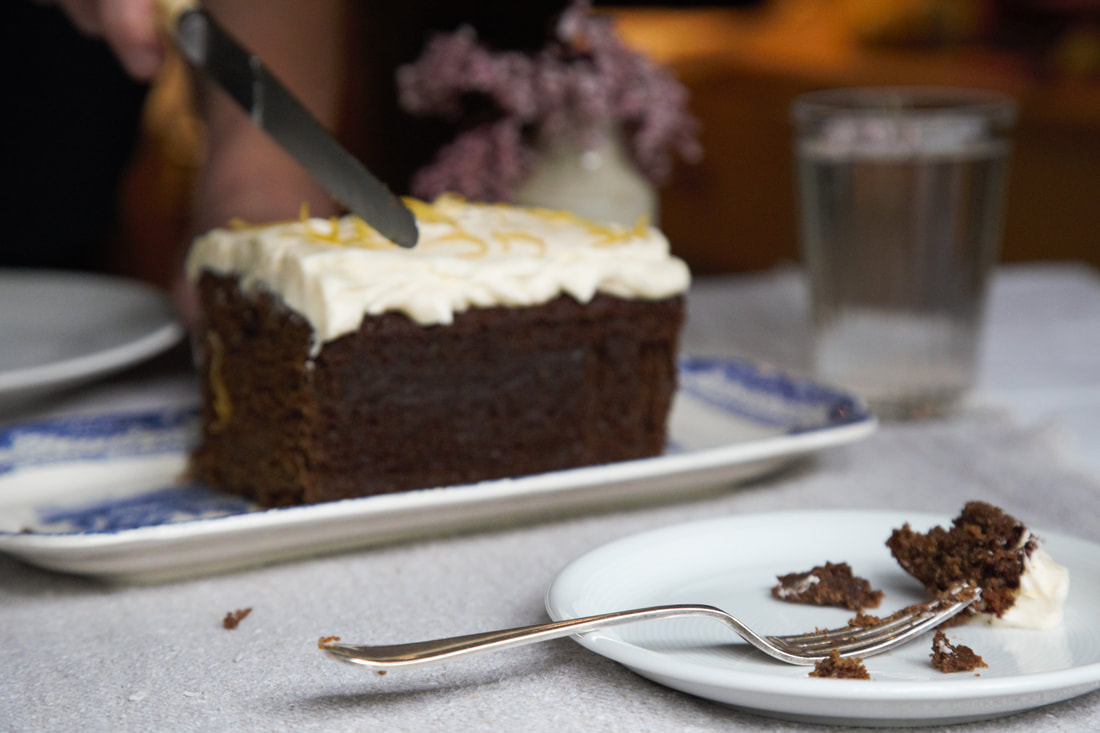 Another in our series of recipes using up old sourdough starter or 'discard'. This sticky, traditional spiced ginger cake is a delicious teatime treat, redolent of high teas and simpler days gone by. I’ve been asked for the recipe so many times, I thought I’d share it with you. I’ve updated it with a tangy lemon and soured cream frosting to cut through the treacly stickiness of the cake. It’s also a perfect vehicle for using up old starter – plenty of depth of flavour in this cake that is only enhanced by the mild acidity of your old starter – anything from 2-5 days old is perfect. But, if you don’t have any sourdough starter on the go, you can substitute with an additional 75g plain flour and 75g of milk with a teaspoon of lemon juice.* Traditional gingerbread with lemon sour cream frosting (makes 1 large loaf cake in an 800g/2 lb tin, or one tray bake. Halve recipe for 1 small loaf cake) For the cake: Plain flour 225g Butter, melted 150g Golden syrup 200g Treacle or blackstrap molasses 200g Old liquid starter* 150g Dark brown sugar 100g Milk 175g Medium eggs 2, lightly beaten Bicarb of soda 1 tsp Fine sea salt ½ tsp Cinnamon 1 tsp Ginger 4 tsp Ground cloves ½ tsp 5-6 pieces preserved ginger, chopped (optional) For the lemon sour cream frosting: Unsalted butter, softened 150g Icing sugar, sifted 300g Thick sour cream or crème fraiche 100g Zest of 1 lemon Method Preheat your oven to 160°C (140°C Fan)/320°F Firstly, mix together your melted butter, syrup and treacle. Add your brown sugar, milk and old starter to the syrup mixture and combine thoroughly. If the starter is a few days old, the gluten will mostly be broken down and it will bring a delicious tang to this richly flavoured cake. Now you can mix in the lightly beaten egg to the rest of the wet ingredients. In another bowl, sift together your flour, bicarb, spices and salt. If using chopped preserved ginger, you can add this to the dry, sifted mix and coat the little pieces well with the flour. Now pour the wet mixture into your bowl of dry ingredients, gently stirring until combined, and no pockets of flour remain. Pour the batter into your greased and lined loaf tin or tray. Place your tin into the preheated oven. The wet batter mix is going to need long, slow baking - approximately 60 mins. Check the cake after 50-55 minutes. The cake will appear ‘set’ if gently jiggled, will have shrunk away from the sides and a skewer will come out clean. However, it is far easier to use a digital probe thermometer, which takes the guess work out of baking and avoids the disappointment of a soggy middle or bottom. The cake will be ideally cooked in the range of 96°C-99°C. At 100°C, the moisture in the cake will begin to evaporate, leaving your cake a little dry. When cooked, leave to cool for twenty minutes or so in the tin and then turn out to cool completely on a wire rack before icing. To prepare the icing: Make sure your butter is very soft before attempting to mix your icing. Use the butter softening mode on your microwave, if necessary. Then, to the softened butter add your sifted icing sugar and gently blend in with a wooden spoon or hand mixer. Once incorporated, you can beat your buttercream until light and airy, then beat in your thick sour cream or crème fraiche and the finely grated lemon zest. When the cake is completely cool, frost and decorate your cake with fine strips of lemon zest. Store somewhere cool - remember the frosting contains fresh dairy. 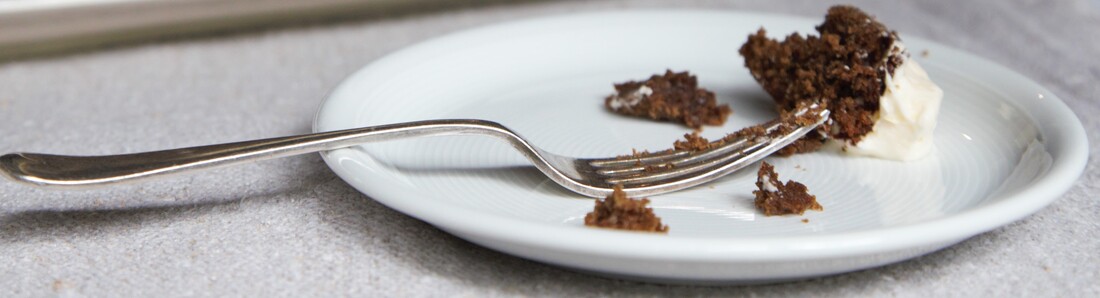 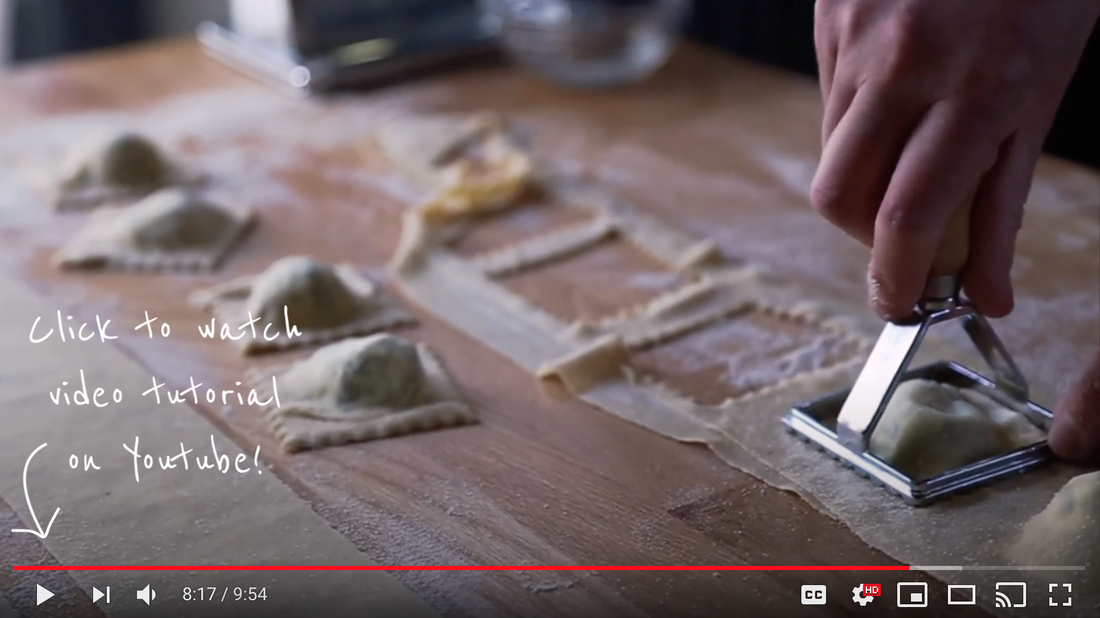 During the Spring and early Summer, there are so many wild herbs to be foraged from the hedgerows or our own gardens. I've made this pasta time and time again, varying the mix of greens I've used each time. I often add sorrel from the garden for its citrusy bite, but I will literally use anything green and leafy, including foraged nettle tips, wild garlic or fat hen. Later in the year, you can raid your vegetable patch for the tenderest tips of spinach, kale or rocket, and throw in some favourite leafy herbs. Click here to watch the video tutorial, or read below! 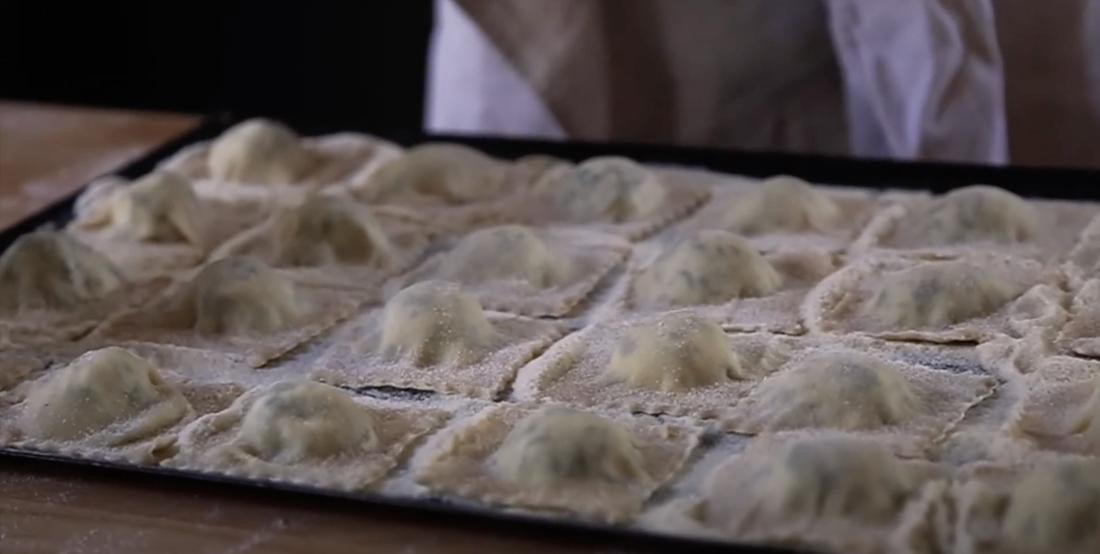 (Makes 25-30 medium ravioli) 1 batch sourdough pasta dough (see our sourdough pasta recipe here) For the filling: Fresh ricotta 500g Fresh greens/herbs 100g (approx.) Pecorino, grated 20g ½ nutmeg, grated Sea salt and freshly ground black pepper For the sage butter: About 24 sage leaves Butter (1/2 pack) 125g Prepare your filling whilst your dough is resting: Take 500g of ricotta and place in a heavy bottomed, wide pan over a medium heat for about 10 minutes, stirring occasionally. About ¼ of the overall weight will evaporate during this process, leaving it resembling a soft cottage cheese. Remove from heat, stir in the grated pecorino (or other hard Italian cheese) and season with a good pinch of sea salt, some freshly ground black pepper and about half a freshly grated nutmeg. Taste a little to check seasoning before adding your chopped greens and herbs. Any soft leaved greens/herbs may be used: spinach, wild garlic, sorrel, young nettle tips etc. Whatever you can forage safely from the hedgerows or your own gardens (or fridges!). Roll out your sourdough pasta, either by hand or machine until it is nice and thin. If using a machine, roll a quarter piece at a time and keep passing through until you are on the thinnest or near thinnest setting. If rolling by hand, roll it as thin as you can reasonably can, trying to keep the thickness even and then divide into 4 long equal-sized strips. Now place a small spoonful (the size of a small walnut) of your filling in a row along your 2 of your pasta sheets, allowing room for each raviolo to be cut out. Using your finger, or a small brush, dampen the area in a square around each mound of filling. This will make the ‘lid’ stick as you carefully place the other 2 sheets over the top of the 2 filled sheets. 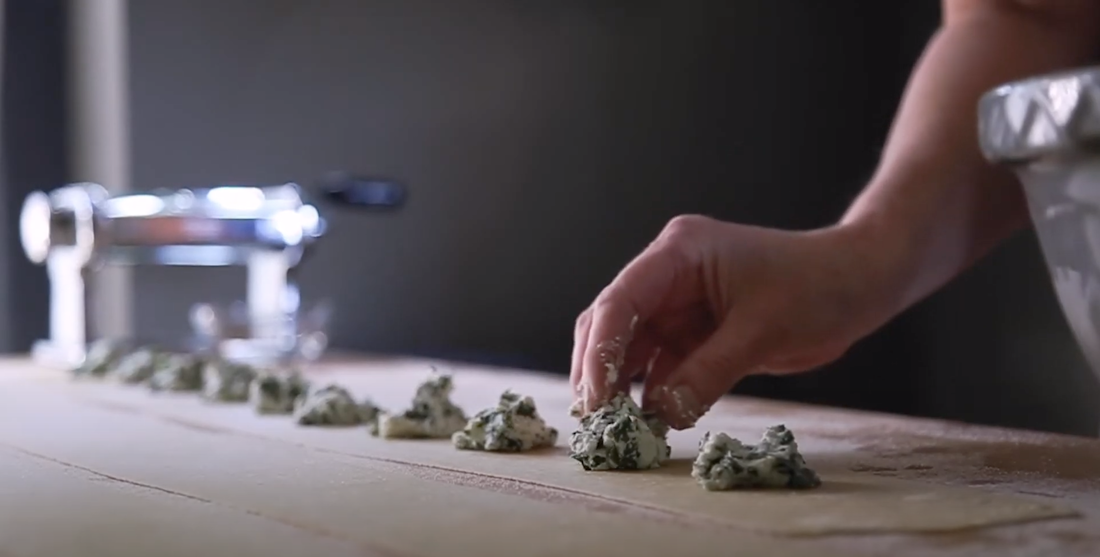 Now, carefully cup your hands around each ravioli mound, sealing each individual one, trying to avoid trapping any air inside. When you have finished, it is time to cut the ravioli out. You can use a square ravioli cutter, a pastry/pasta roller, or simply a knife. If using the latter, make sure you crimp and seal the edges of each one with a fork. If you are not cooking your ravioli straight away, coat in a little semolina or rice flour (not ordinary flour) to prevent sticking together. Place on a tray and cover until needed (in the fridge, if necessary). 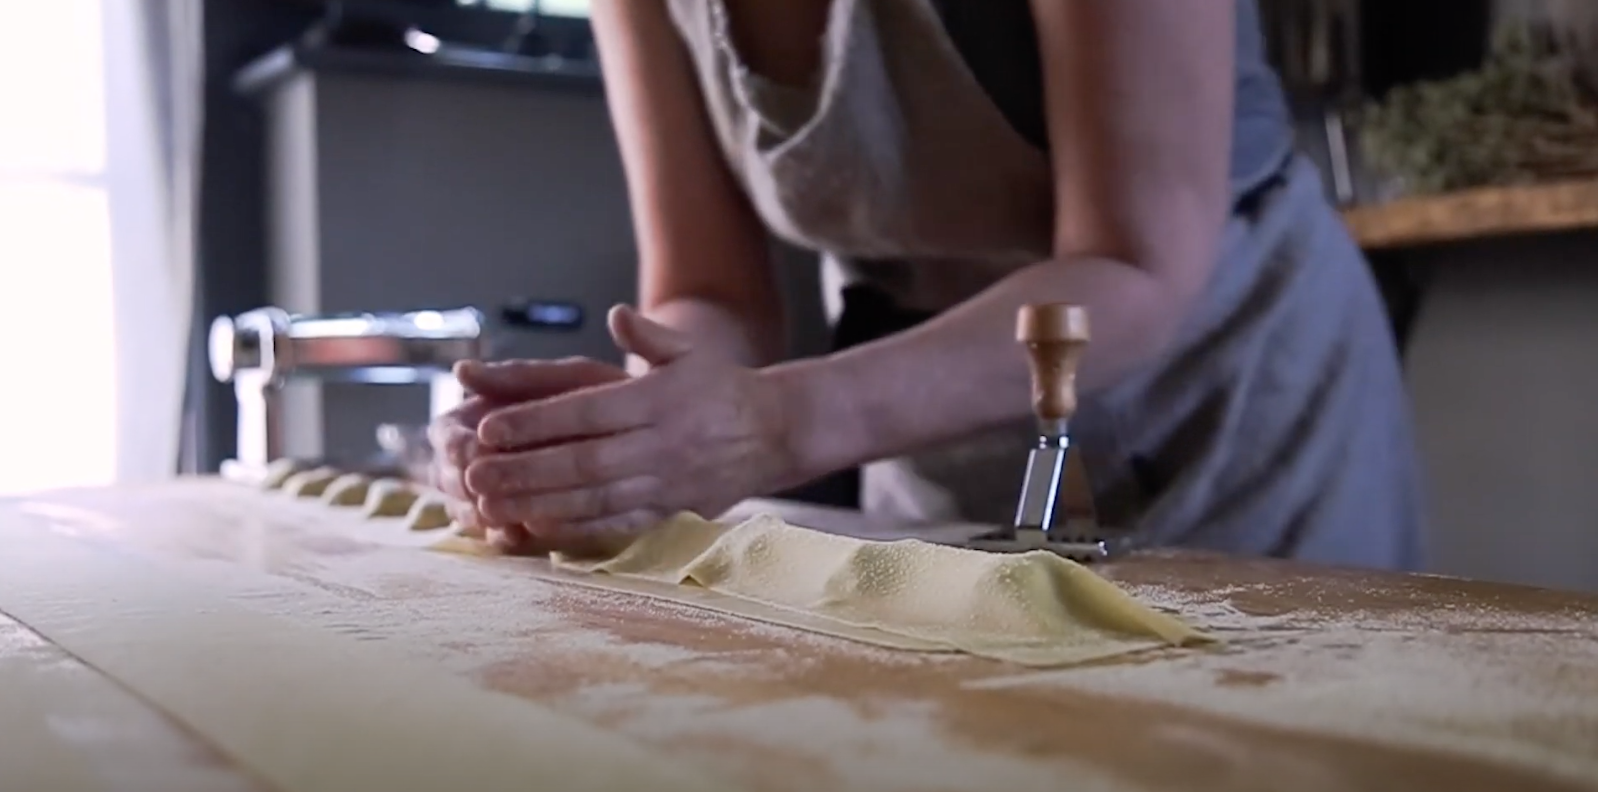 Just before you are ready to eat, prepare the sage butter: Put half a pack of butter in a heavy bottomed pan and place over a medium heat. Let the butter melt, then throw in a dozen or so whole sage leaves. Allow them to crisp but not burn in the butter. Remove and place on a paper towel as they crisp, then turn up the heat a little and watch as your butter first bubbles, then finally foams and becomes glorious-smelling browned butter. Throw in the rest of chopped sage at the last and take off the heat and allow the chopped sage to steep in the hot butter as you bring your largest pot of water to the boil.
Now it’s time to cook the pasta. Add salt to the pan, bring to a rolling boil, then place the ravioli in the pan and cook for approx. 3 mins until tender and ‘al dente’. Depending upon the size of your pan, you may need to cook in 2 or 3 batches, but this shouldn’t matter as they are so quick to cook. Drain the cooked pasta well, pour over the sage brown butter and garnish with some of the whole, crispy sage leaves. Serve with a simple dressed green salad of garden leaves and enjoy! 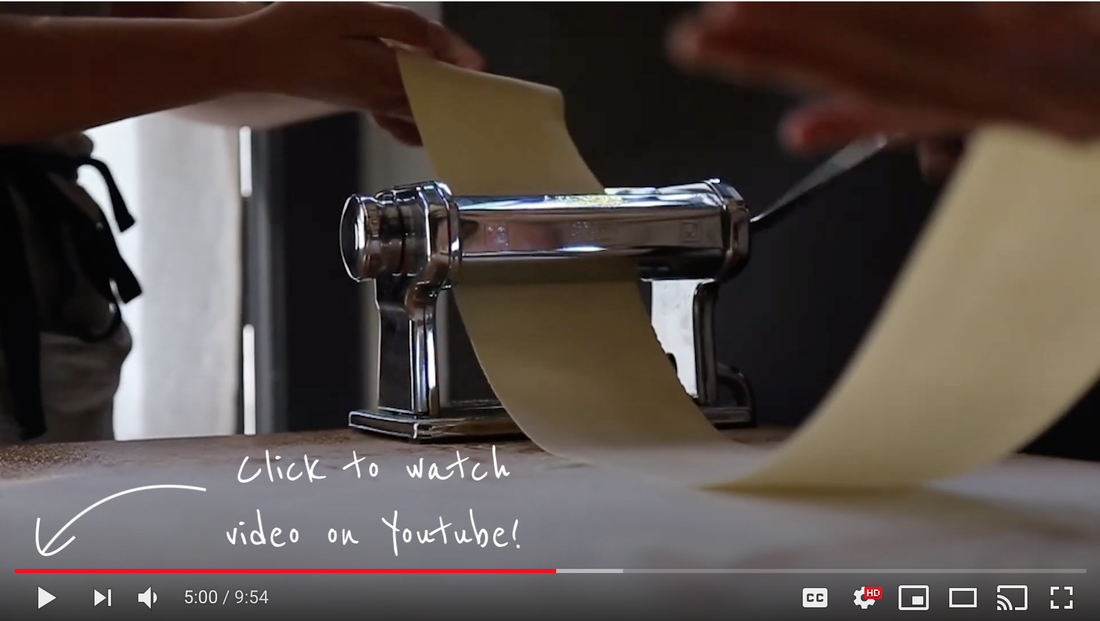 Pasta is a simple flour and liquid (either egg or water) mixture that is kneaded into a stiff dough – an ideal way to use up starter that is a few days old, rather than discarding before you next refresh. This recipe uses liquid starter. If you are keeping a stiff starter, simply adjust the quantities to accommodate (about 15g less flour and add 15g water). If you are making vegan pasta, replace the egg with 100-110g of water. You can make pasta with fine semolina (from the Southern Italian hard or ‘durum’ wheat) or with fine pasta grade ‘00’ flour. I often make mine with a mix of the two. Watch our video tutorial on Youtube here or read below. 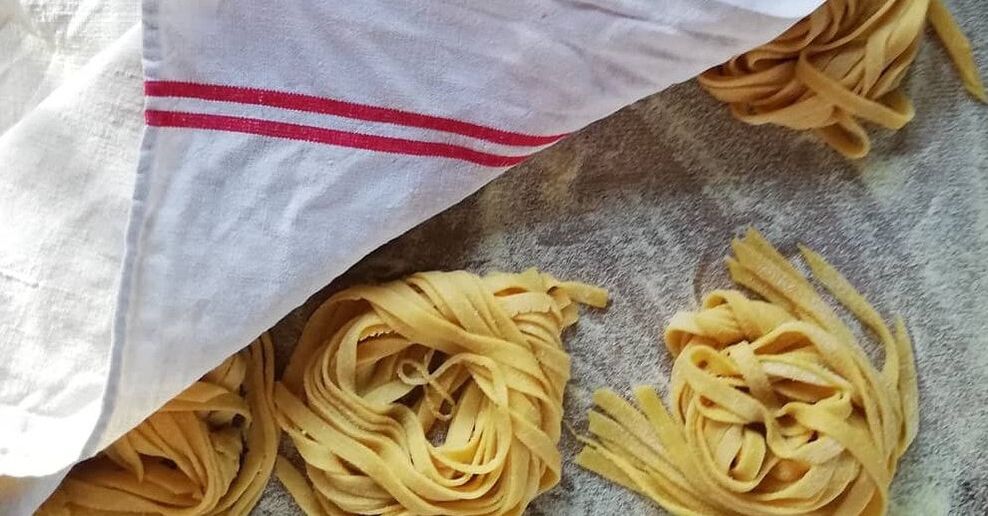 Basic sourdough pasta dough
(Makes about 450g) Ingredients: ‘00’ flour 100g Semolina 150g Liquid starter 100g Medium eggs 2 Dash of olive oil Method: Mix the semolina and ‘00’ flour in a large bowl. Traditionally, a ‘well’ is made in the middle of the flour into which you can add your liquid starter and eggs. Using a regular knife, dough scraper or simply two fingers, start to mix the dough from the centre, incorporating more of the flour as you stir until you have a stiff dough and all the flour has been absorbed. Add a dash of olive oil and knead in before turning your dough out onto a clean surface. Knead for five or so minutes until you have a smooth and elastic dough. Wrap in cling film and rest for 30 minutes or so. Once rested, dust your counter with semolina before rolling your dough. You can pass through your pasta machine or roll out using a rolling pin. If using a pasta machine, divide into 4 pieces, keeping those you are not yet using wrapped. Pass the first piece through the machine on its thickest setting. Fold the resulting long strip of dough into thirds over itself, turn through 90 degrees and pass through the machine again. You should have a smooth homogeneous strip that you can pass through the machine at successive thicknesses until the desired thickness is reached (usually the thinnest or one above the thinnest setting). Repeat for the 3 other pieces of dough. You will end up with 4 long strips of dough that can be passed through the shaper on your machine to make fettucine, tagliatelle etc. Or you can hand cut as desired. Place the cut and shaped pasta in a bed of semolina or rice flour and give it a fine coating to prevent sticking – if you use regular flour, it will be absorbed and your pasta will stick to itself. If rolling by hand, try and keep an even thickness throughout – you may find it easier to divide your dough into smaller pieces before rolling, until you are more practiced at this. Depending upon the final pasta shape you have chosen, you can hang your pasta or leave on semolina-coated trays, covered with a cloth, ready for when you want to cook. When ready to cook, bring water to boil in your largest pan (which allow the pasta plenty of space to remain separate and the temperature of such a big pot won’t drop so significantly when you add the pasta), throw in some salt and cook for 3-4 minutes only. A simple sauce with oil or butter, will allow you to appreciate the delicious, fresh pasta to the full. Why not try infusing 1 ½ tablespoons of oil per serving with some sliced garlic and some chilli flakes and toss through the drained pasta. Finish with some coarse sea salt, freshly ground black pepper and a scattering of fresh pecorino. Simple and delicious  Thank you very much to video-wiki site 'EZVID' for including us in their post on '5 resources for learning to make bread' - you can find the post here!
 You'll know by now how much I hate waste! I spend a lot of time developing recipes to use up those ingredients that got overlooked for just a little too long and are seemingly past their best. This always happens to grapes in our household. The bunches are attacked when they are plump, luscious and firm. But after a while, they wither and people start to avoid them in the fruit bowl. Past their best, they are overlooked and, invariably, find their way into the compost or bin! It's time to see these wrinkly old grapes for what they are: young raisins! Too moist still to be substituted for raisins without further dehydration, but perfect for a wet batter mix such as carrot cake! Et voila! Our grape and carrot loaf cake! A delicious variation of an old favourite: sweet, moist and beautifully textured with seeds and nuts, and complemented by a tangy sour cream frosting. It's an easy all-in-one-bowl batter method. Just take your time preparing all your ingredients before you start, turn your oven on and away you go... Grape and carrot loaf (makes 1 large loaf cake) For the batter: Self raising flour 200g Vegetable oil 170ml Grated carrots 200g ‘Old’ black grapes 80g Pecans 50g Pumpkin seeds 30g Sultanas 50g Granulated sugar 90g Brown sugar 90g Medium eggs 3 Vanilla extract 1 tsp Fine sea salt ½ tsp Cinnamon* 1 tsp Cardamom* 1 tsp Zest of 1 orange Freshly grated nutmeg *(if you don’t have individual spices, substitute with 2 tsp mixed spice overall) For the sour cream frosting: Unsalted butter, softened 150g Icing sugar, sifted 300g Sour cream or crème fraiche 100g Method Preheat your oven to 160°C (140°C Fan)/320°F Firstly sift together your SR flour, spices and salt. Now, place your oil, sugars and eggs together in a mixing bowl and beat together. Stir in your vanilla extract and grated carrots. Depending on the size of your grapes and how wrinkled they have become, either half or quarter them and add to your bowl. Now throw in your nuts, seeds, orange zest and sultanas and combine. Mix the final batter by gradually stirring in your flour/spice mix. Don’t over beat your batter at this stage (you will develop gluten which will make your cake rubbery); the flour just needs to be evenly incorporated. Pour your batter into a greased and lined tin – I like to use a large loaf tin for this cake. Place your cake into the preheated oven. The wet batter mix is going to need long, slow baking at a cooler than usual temperature - approximately 90 mins at 160°C. Check the cake after 80-85 minutes. The cake will appear ‘set’ if gently jiggled, will have shrunk away from the sides and a skewer will come out clean. However, it is far easier to use a digital probe thermometer, which takes the guess work out of baking and avoids the disappointment of a soggy middle or bottom. The cake will be ideally cooked in the range of 96°C - 98°C. At 100°C, the moisture in the cake will begin to evaporate, leaving your cake dry and overcooked. When cooked, leave to cool for twenty minutes or so in the tin and then turn out to cool completely on a wire rack before icing. To prepare the frosting: Make sure your butter is very soft before attempting to mix your icing. Use the butter softening mode on your microwave, if necessary. Then, to the softened butter add your sifted icing sugar and gently blend in. Once incorporated, you can beat your buttercream until light and airy, then beat in your sour cream or crème fraiche. The slight acidity of the cream cuts through the sweetness giving a wonderfully tart edge to your frosting. When the cake is completely cool, frost and decorate your cake with pecans, orange zest or edible flowers. Store somewhere cool - remember the frosting contains fresh dairy. 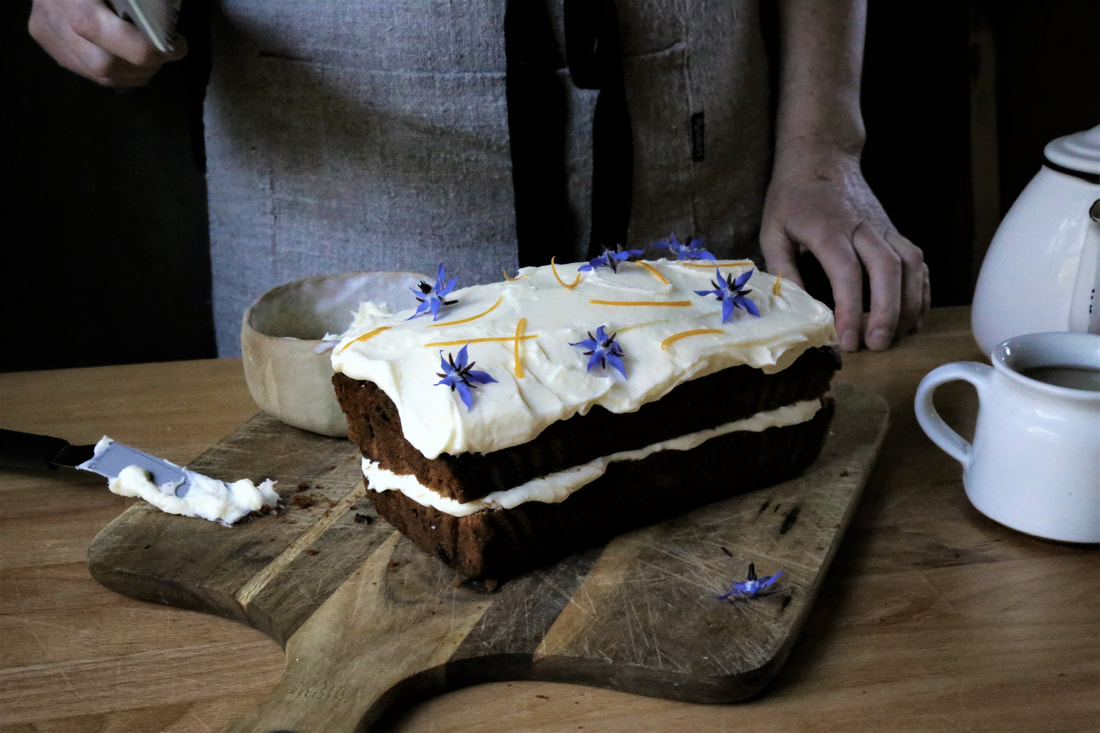  So you've made your starter, and you're rightly proud of this bubbling, fermenting pot of life that you've grown and nurtured. Here is our basic country sourdough recipe. This uses a kneading method. Some days, it just helps to bash out your frustrations on an inanimate lump of dough! Remember, this is sloooooowwww dough. All good things are worth the wait!
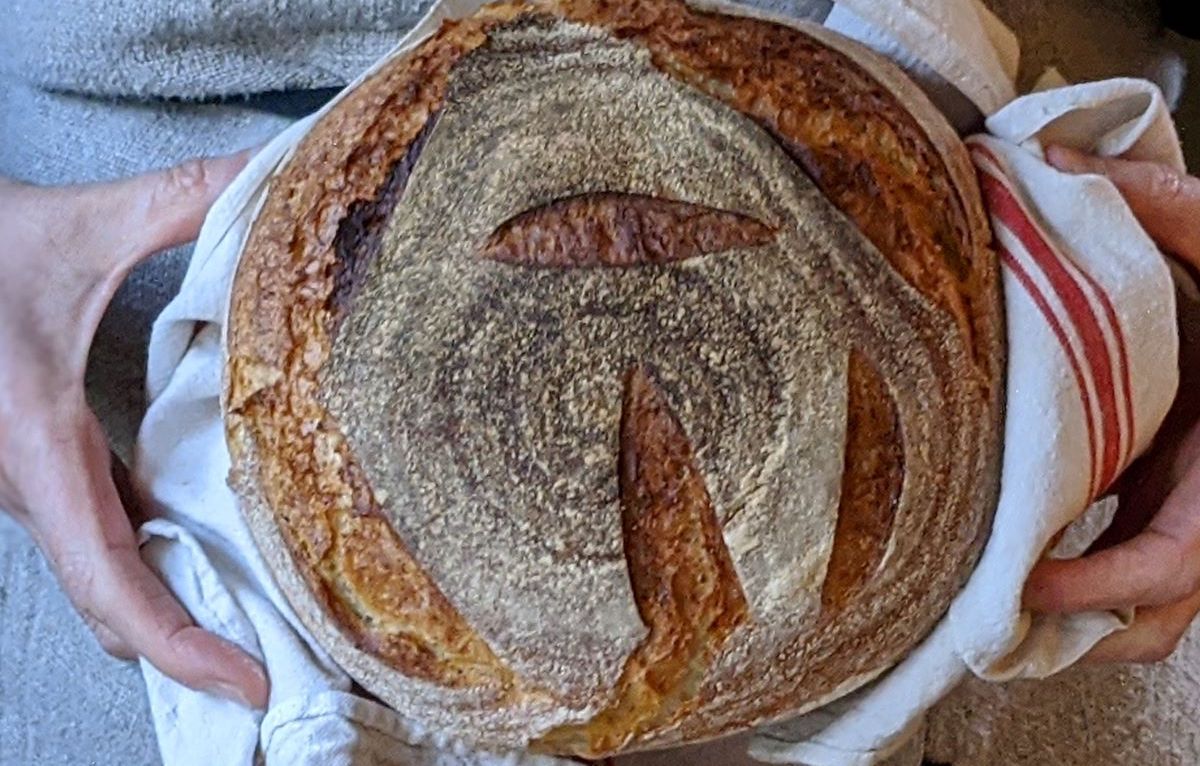
Country White Sourdough (makes 1 medium loaf) Plan ahead. Sourdough will always be at least 2 days in the making. Feed your starter about 8 hours (overnight is perfect) before you are ready to make your sourdough, so that it is lively and active before you begin. 300g strong white flour 80g wholemeal flour 120g active starter (liquid, 100% hydration) 250g water 8g fine sea salt Measure your dry ingredients into a large bowl. Place your starter and water in a separate bowl and mix roughly together. Now pour these into the dry ingredients. Mix with your scraper until all the ingredients are combined and a rough dough has formed. Turn out onto your clean work surface and knead for 15-20 minutes until you have an elastic dough which doesn’t stick to your fingers or to the work surface. Alternatively, place in your mixer with the dough hook attachment and mix on medium for about 7 minutes until the dough comes cleanly away from the sides of the bowl. Form the dough into a ball and place back into your lightly floured bowl. Cover with a large plastic bag or a baking cloth and leave to prove. After 30 minutes, fold and stretch your dough: using your scraper, turn the dough carefully out onto a lightly floured surface – with the ‘top’ of the dough now underneath. Taking the 4 points of the compass in turn, pull the dough gently to one side then bring over to the middle point of your dough (as if you were making a paper windmill). When all 4 ‘corners’ have been brought into the middle, turn your dough back over and place back in the bowl, so that the top of the dough remains uppermost. Repeat folding action every half an hour. This is the ‘bulk proof’ stage and should take 3 or more hours. Stretch and fold your dough about 6 times during this stage. Each time you will be building the strength of your dough and improving the final loaf. After 3-4 hours (depending upon ambient temperature) you are ready to shape your dough. Don’t expect it to have doubled in size like a yeasted dough. It will not need de-gassing. Using the round side of your scraper, carefully tip out the dough onto a lightly floured surface, so that the ‘top’ of the dough is now lying underneath on your floured countertop. Shape your loaf by stretching the edge of the dough and bringing onto the middle, like when stretching and folding your dough during the first prove. Go around the entire circle of dough, then flip and place it seem side down on your counter, ensuring there is no flour underneath the seam. Now you can ‘tighten’ your ball by dragging it towards you and allowing the friction of the counter to resist the movement. This should cause the ‘skin’ of your ball of dough to tighten a little. Adjust and do the same in a few different directions around your ball. Do not over-tighten. A few little stretches are all it takes. You don’t want to tear the skin that is containing your dough under tension. When you have a tight ball, place seam side up into a pre-floured proving basket – wholemeal flour works best here, as the bran prevents sticking (do not use rye flour). However, a well-shaped loaf will not stick in your banneton. It is essential that you pay attention to the tightening of the dough at this stage. If your loaf collapses when you tip it out, ready to bake, it could well be you have not tightened sufficiently before placing in the basket. If you have no proving basket, flour a good quality linen cloth well, placed inside a round 1litre bowl (eg Pyrex bowl). This prevents your dough relaxing into a puddle whilst it proves for a second time. Cover with a loose-fitting plastic bag or baking cloth for about 3-5 hours (depending upon ambient temperature) until the dough appears ready. At this stage, the dough will bounce slowly back when pressed gently with a floured finger. If it bounces rapidly back, it needs a little longer. If the indentation remains, you have over-proved your dough. Alternatively, you can place the dough in the fridge when it appears to be nearly ready, say after 3-4 hours, and leave overnight. When the loaves are ready to bake, turn them out onto a lightly dusted peel. Be gentle with your loaves at this stage. Slash the loaves at an oblique angle of about 30 degrees, to allow extra expansion in the oven. Place in a very hot oven, pre-heated to 240°C. As you place the loaves in the oven, spray the walls, ceiling and floor of your oven with water, avoiding the loaves themselves. Now turn down your oven down to 220 °C and bake for 35-45 minutes for the larger, until golden or dark brown, according to preference. Alternatively, bake inside a pre-heated Dutch oven or cast iron casserole dish – the lid will keep in all the steam that is released by the dough during the first 15 mins, after which you can remove the lid and continue to bake and crust over. To check reliably whether your bread is baked, place a probe thermometer into the centre. A loaf will be reliably baked when the thermometer reads 95°C or more. Notes on refreshing your starters: Wheat starter: Wheat starters can be kept in a liquid state (usually 100% hydration) or a stiff state (usually 50% hydration). This recipe uses a liquid starter. To refresh your liquid starter, take 100g of starter (discarding or using the rest) and add 100g water and 100g of flour, ie equal parts flour and water. If using a new recipe, always check whether a stiff or liquid starter is required and adjust your overall water/flour quantities in the recipe, if necessary. Leave the refreshed starter at a warm room temperature for 8-12 hours before using. If it is not required straight away, simply place in the fridge after a few hours. Your starter will keep refrigerated for a couple of weeks (and can even be dehydrated or frozen!), but it is best to refresh it every 7 days even if not being used. 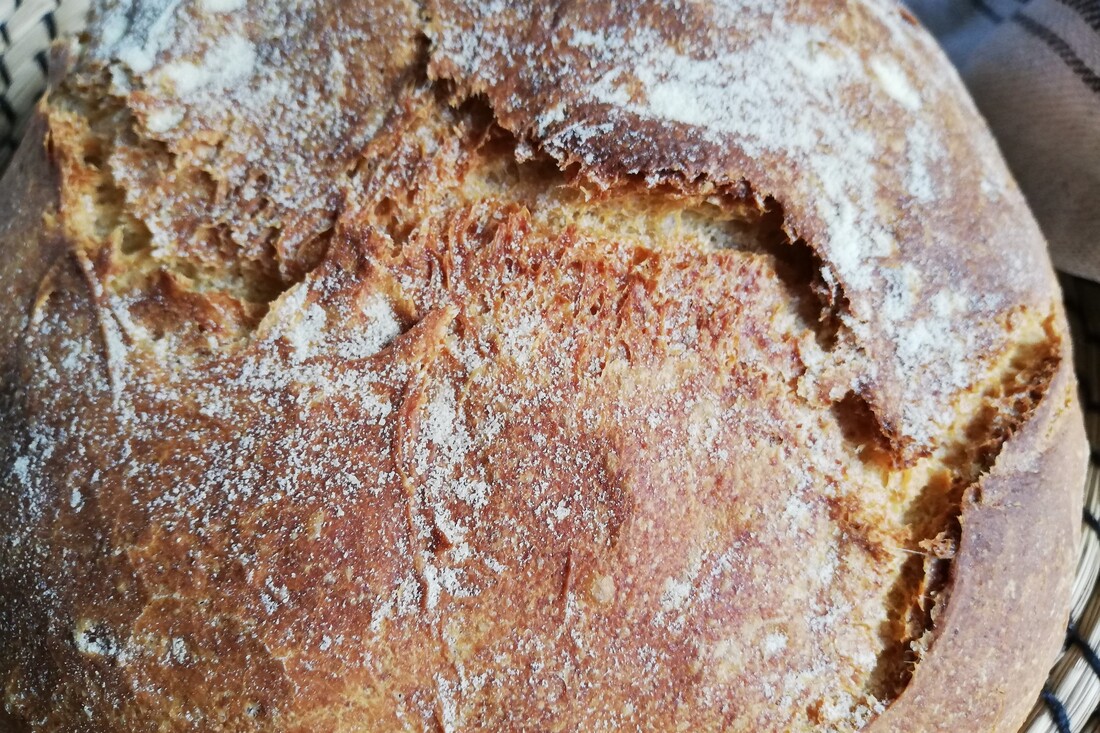 Pane Pugliese
(makes 1 large loaf) Although many of my recipes are inspired by the Tuscany region, this recipe is a Southern Italian treasure from the Puglia region. Pane Pugliese is made with either all or the greater part hard durum wheat – fine semolina or ‘semola rimacinata di grano duro’. The finest example of this is Pane di Altamura, now granted PDO (Protected Designation of Origin) status. The loaf is a beautiful pale gold in colour and has the characteristic crumb and crunchy crust of a semolina bread. It is utterly delicious and well worth a try. If you wish, you can use all semolina for this recipe. Simply replace the bread flour in the biga and dough with more semolina. Ingredients Overnight biga: Strong bread flour 100g Tepid water 100g Fresh yeast 2g For the dough: Strong bread flour 100g Fine durum semolina 400g Tepid water 300g Biga, from above 200g Fresh Yeast 10g (or 5g instant dried yeast)* Sea salt 10g *if you intend to prove overnight in the fridge, reduce the amount of yeast to about half. Method The night before, mix together the ingredients for the biga and leave, covered, overnight at ambient room temperature. Make the dough by combining the above ingredients and knead for 10-15 minutes until you have a smooth elastic dough. Leave, covered, in an oiled bowl for 30 mins, after which you can stretch and fold your dough. Cover once more and leave for a further 30 minutes. When your dough has significantly increased in size, after this first prove of about 1 hour, tip it out onto a lightly floured surface and shape tightly into a ball. Place into a floured banneton, cover and leave to prove again for 1 – 1½ hours, depending on ambient temperature. Alternatively, place in the fridge and allow to prove slowly overnight*. Pre-heat the oven to 240°C. When your loaf is ready, slash the top with a sharp knife or baker’s lame and either slide from a peel onto a hot baking stone, or bake inside a preheated cast iron pot. Turn oven down to 220°C and bake for 45-50 minutes. If baking in a cast iron pot, remove the lid after 15 minutes to allow the loaf to develop a golden crust. The loaf will be baked when the crumb reaches 95°C. Leave to cool on a cooling rack.  Rhubarb is seasonal and abundant. Here we've coupled it with the last of the Spanish blood oranges, but any orange will do!
Ingredients: For the sweetcrust 75g icing sugar 125g butter 1 medium egg 250g plain flour For the filling 4-5 sticks of rhubarb 250g sugar 250g water 1 orange (or blood orange) For the frangipane 150g caster sugar 150g butter 3 medium eggs 150g ground almonds 30g plain flour Method: This recipe involves making 3 elements - the sweetcrust, the filling and the frangipane - separately, and assembling together at the end. For the sweetcrust:
For the filling:
For the frangipane:
Now you're ready to assemble!
 Porridge bread (Makes 1 large loaf, 2 small or about 8 rolls)
For the porridge*: 80g porridge oats 220g boiling water *alternatively, use 300g leftover porridge For the dough: 300g above porridge 330g strong bread flour 180g tepid water 10g fresh yeast (or 5g instant dried yeast) 8g fine sea salt Method: First, pour over the boiling water over your oats, mix and set to one side to cool. Alternatively, use any leftover porridge you may have. When cool, place with the tepid water in a bowl or mixer. Add the flour, salt and yeast, ensuring the yeast is kept separate from the salt, at least initially. Mix with your scraper until all ingredients are combined and a rough dough has formed. Turn out onto your work surface and knead for 15 minutes or so, until you have an elastic dough which doesn’t stick to the work surface or your fingers. Alternatively, knead in your mixer, using the dough hook attachment for approximately half the time. Form the dough into a ball and place back into your lightly floured bowl. Cover with a large plastic bag or a baking cloth and leave to rest for about an hour. Now it’s time to fold and stretch your dough: using your scraper, turn the dough carefully out onto a lightly floured surface – with the ‘top’ of the dough now underneath. Taking the 4 points of the compass in turn, pull the dough gently outwards then bring over to the middle point of your dough (as if you were making a paper windmill). When all 4 ‘corners’ have been brought into the middle, turn your dough back over and place back in the bowl, so that the ‘top’ of the dough remains uppermost. Rest, covered, for a further 15-20 minutes so the dough can relax again. Now, you are ready to shape your dough ready to place into a tin, a proving basket or into rolls. Carefully tip out the dough onto a lightly floured surface. Turn the dough back over so that the ‘top’ of the dough is now uppermost. Divide into portions for rolls or loaves, then shape into a smooth ball, or oval if baking in a tin If shaping your dough in an oval to fit a tin, remember to grease your tin before placing the shaped dough inside, with the seam concealed neatly underneath. Cover your loaf/loaves/rolls whilst they prove for a second time for about an hour until they appear nicely ‘bloated’ and are approximately double in size. Preheat your oven to 240°C. When the dough is ready (slowly springing back when you prod gently with a floury finger), place into your hot oven. Spray around the floor and walls of the oven to create steam then quickly close the oven. Turn down the oven to 220°C and bake until golden brown on top and bottom. Rolls will take 12-15 minutes, a small loaf will take about 25-35 minutes and a large loaf, 40-45 minutes. If you have a probe thermometer, the bread is cooked when the centre of the loaf reaches 95°C. |

Our workshops are run by award-winning sourdough baker Helen Underwood.
Categories
All
Archives
November 2023
|