
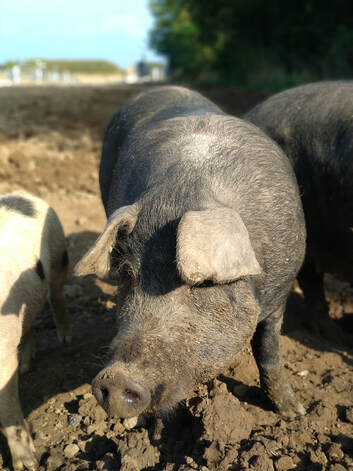
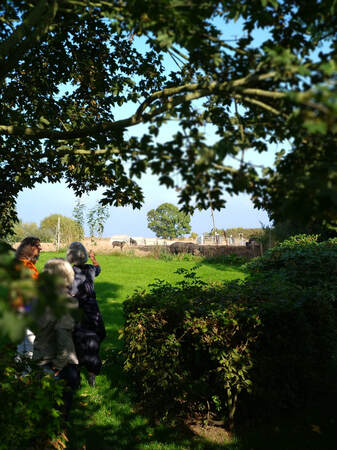
The mood is sombre as we gather at the edge of the field, just metres away from the house in which we are staying this week. Perhaps we are a little nervous. The joking and bonhomie have ceased for a while. Poul, our host, has brought a small group of us to witness the profound act that is about to take place. He has everything in order; everything prepared to make what follows quick, painless and stress-free. He throws a handful of meal down for the gathering animals then deftly presses the electric charges either side of the chosen pig, once through the brain, then through the chest. The animal slumps quietly at the first. The other animals keep eating as the pig is then hoisted out of the field and bled, feet away. If they have noticed, they show no sign.
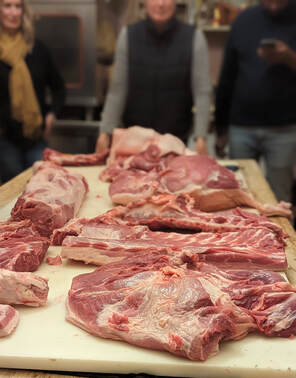 Pig butchery by Fabio Borgoni Terroir Tuscany 2023 Pig butchery by Fabio Borgoni Terroir Tuscany 2023 Our farm tour over, we change and move inside. We first visit the room where the pig, whose death we have witnessed, is being prepared for veterinary inspection and later, butchering. The government vet is responsible for visiting small abattoirs and the few licenced farmers, like Poul, to inspect both the recent health of the animal and the manner of its death. Most Danish pigs, however, are dealt with at one of two large cooperative abattoirs – a throughput of millions each year. The time and attention we have witnessed so far could not possibly be afforded to all those animals.
Denmark is home to about 5000 pig farms and around 3000 of these are super-farms, housing more than 5000 pigs. And yet as I travelled the two hours from Copenhagen to Poul and Carla’s farm, I spotted not a single pig. Coming from the UK, where 40% of the pig population is farmed outdoors, I had expected to see the fields full of sows and piglets, their familiar corrugated shelters dotting the landscape. Here, the pigs are invisible. Their welfare – or lack of it – is a matter for the production unit owners, their workers and the government. The consumer is blissfully, or maybe wilfully, ignorant. 90% of Denmark’s 28 million pigs slaughtered each year are destined for export. Such is the worldwide demand for pork; in many parts of the world, it is customary to eat meat three times a day. And, it has to be said, Denmark’s welfare and food safety standards are very high compared with much of the rest of the world and many of the countries it exports to. Simply stated, to satisfy current demand, it would be impossible to produce pigs as Poul and Carla do, on small scale operations, slaughtering in a painless and stress-free way and without live transportation. And here’s the rub: we need to reduce production. We need to eat less meat. We have to reconnect with the process. We have to see the meat we eat as once a living animal that ought to be respected. It should not be a throw-away, disposable commodity. If we are prepared to eat meat, we must be prepared to understand and engage with the farming practices that have produced that meat. We must be prepared to eat less in order that we can pay more. We must be prepared to value this food for all that it is worth and all that it has come from. The question is how do we effect this change? At first, it seems like an impossibility – changing people’s attitudes to meat-eating and meat production is fraught with economical, historical and cultural sensitivities. But then I am reminded of how far we have come in the UK and Europe with regard to egg production. In January 2012, legislation was brought in to end the battery farming of hens within Europe. A good start but, of course, there’s always wriggle-room in legislation and it didn’t put an end to caged birds altogether. However, consumer pressure in the UK meant that one by one supermarkets were under peer pressure to announce they would only sell free-range eggs. Many chain restaurants were hard on their heels. Because that’s what consumers demanded. Not perfect – plenty of room for improved welfare – but a big change in the last 20 years. However, crucially, this welfare change meant the consumer was faced with only a small premium in the price they paid. High-welfare, small-production meat from regenerative farms would mean a huge increase in cost – maybe more than 100%. The world’s population cannot afford to pay such prices. But they can make choices. Not everyone. Not everywhere. But we can make a start. We can apply consumer pressure and outrage at intensively farmed meat from caged animals. We can connect with the process of meat production and share our knowledge with others. Let no one forget that that sterile, shrunkwrapped polystyrene tray of meat in the supermarket was once a living, breathing animal and that it’s life mattered. We can ensure nothing is wasted – either from the butchered animal or from the meat we buy. No life is disposable. No meat should be thrown away. If we valued it more, we would pay more. But the simpler truth is this: perhaps if we paid more, we would value it more. 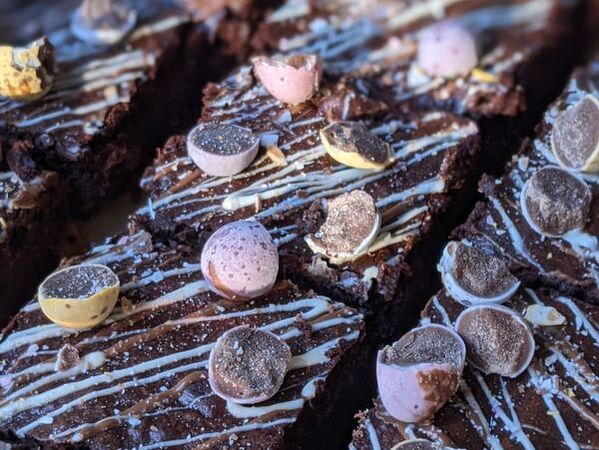 This Easter, we've indulged in these rich, chocolatey, fudgy brownies incorporating those well-known mini eggs with a crisp candy shell. Use your favourites, but ours were made with the ones in the bright yellow packet which I can never resist at this time of year. To balance the sweetness of all that milk chocolate, we've used dark chocolate, extra cocoa and a shot or two of espresso to keep the grown ups happy. Quick and easy to make and bake! Happy Easter! Fudgy Easter Brownies (makes 20-24 small squares) Ingredients: For the brownie batter: 300g dark chocolate (50-70% cocoa solids) 200g unsalted butter 200g caster sugar 200g light brown sugar 5 medium eggs + 1 yolk 30 ml espresso (approx. a double shot) 2 tsp vanilla essence ½ tsp salt 180g plain flour 50g cocoa powder 160g mini eggs (2 packs), lightly smashed For the topping: 30g white chocolate, melted 30g milk or dark chocolate, melted 160g (2 packs) mini eggs, broken in half/large pieces Preheat your oven to 180°C. Line and grease a 13 x 9 inch (or similar*) baking tin. Melt the butter and dark chocolate together over a pan of boiling water or using the microwave in 30 second bursts. Add the sugars and combine, ensuring any lumps are smoothed out. Add the eggs, yolk, vanilla and espresso and mix well. In a separate bowl, sieve together the flour, cocoa and salt, then carefully fold into the wet mixture until just (but fully) combined. Take your broken pieces of mini eggs (you can use a rolling pin to smash a little in the bag, but make sure you don’t crush them into tiny pieces) and fold into the mixture, ensuring an even distribution. Pour finished batter into your lined tin. *If you don’t have a tin of the suggested size, you can use any tin that offers a similar surface baking area – just multiply the length by the width and if the result lies in the range 100 – 120 square inches, it should be fine (eg a 10 x 12 inch tin would have a surface baking area of 120 square inches). Bake for around 25-30 mins. The finished brownie will be fudgy not ‘cakey’ (hence no raising agent in the mix), so you are looking for skewer to come out clean-ish, not squeaky clean. It should retain a little squidginess and will continue to bake a little once out of the oven as you leave to cool in the tin. Once cool, turn out and using a teaspoon or a narrow nozzle on a piping bag, drizzle both the milk and the white chocolate over the brownies, then place the chunky pieces of broken eggs for the topping into the still warm chocolate. Once arranged, a little wobble show you which mini eggs aren’t stuck in the melted chocolate. Either move to a more chocolatey area or pipe a little extra blob of chocolate to stick it down. Cut into 20-24 pieces and allow the topping to cool fully before you move the brownies into a tin, so that the topping can set and fix the mini eggs in place. Out of season, you could replace the mini eggs with a combination of white chocolate chips and walnuts or pecans. NB If you want to make a smaller quantity, halve all ingredients and make in a 7 inch square tin. 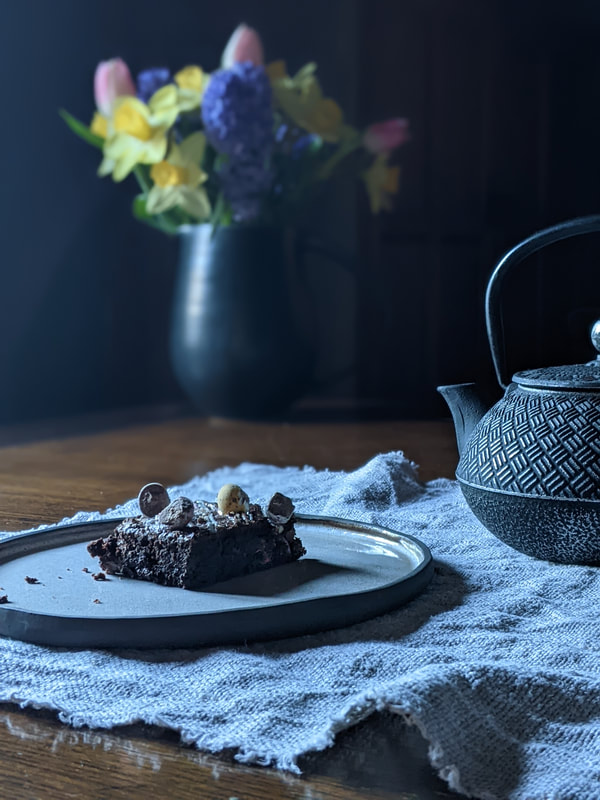 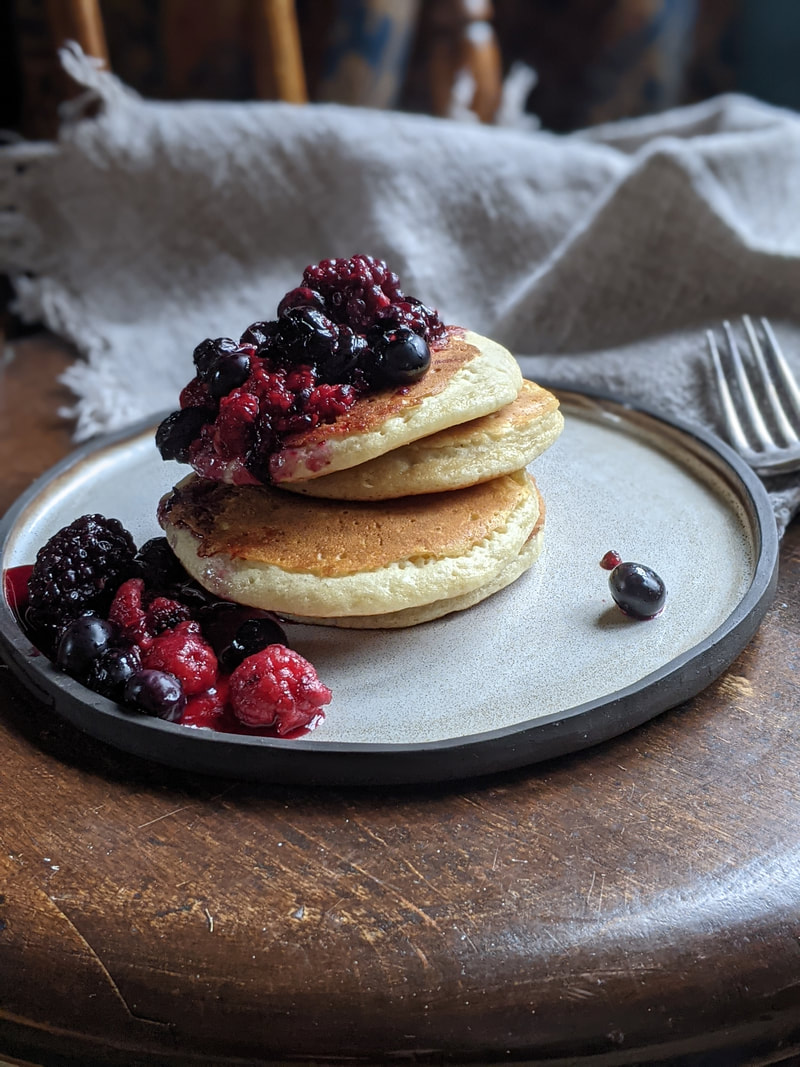 Fluffy sourdough pancakes!
|
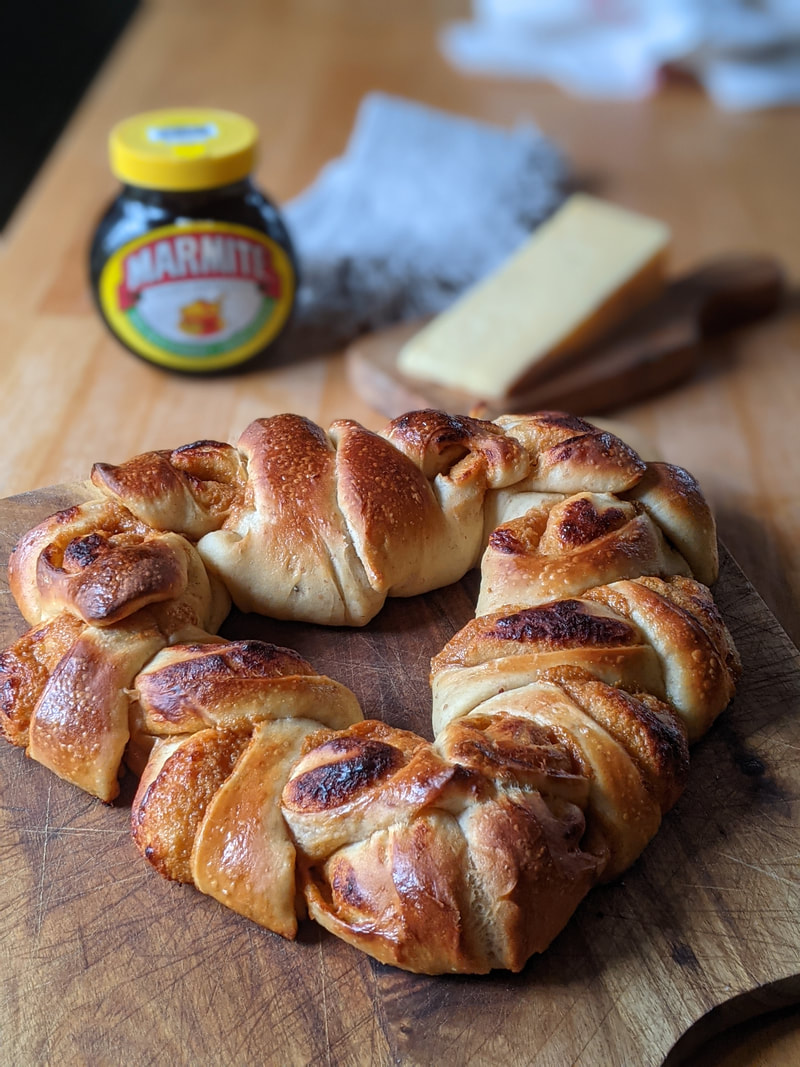
| Ingredients (Makes 2 hearts) For the dough: 450g strong white flour 50g wholemeal flour, eg spelt 2 large eggs 200g whole milk 2 tbsp runny honey 50g unsalted butter, melted 7g instant dried yeast 10g fine sea salt For the filling: 150g cream cheese 100g finely grated cheddar 50g yeast extract (eg Marmite) 1 egg, beaten to glaze. | |
Method
To make the enriched dough, place your flours in a bowl and add the yeast. In a jug, mix together the milk, honey, eggs, melted butter and salt. If using a mixer with a dough hook, place the liquid into your mixing bowl, then add your flour and yeast. If mixing by hand, you can pour the liquid ingredients into your bowl of flour and yeast. Mix together with a plastic scraper, until you have a formed a rough dough.
Turn out onto your counter and knead for approximately 15 minutes until you have a smooth and elastic dough. In a mixer, this will take half the time. Form into a ball, then place back in your bowl and cover. Leave at ambient temperature to prove for about 1.5 hours until the dough has roughly doubled in size. If your kitchen is cool, it may take a little longer.
Whilst it is proving, make the filling. Take 150g of cream cheese – any type, even mascarpone, whatever you have to hand – and add 100g of finely grated good cheddar – the sharp, flavourful mature kind. Now add about 50g Marmite (or any brand of yeast extract).
When ready, turn your dough out onto the counter and degas by slapping with the flat of your hand to remove any gas bubbles. Divide your dough into two equal halves, for the two hearts you will make. With a dusting of flour beneath, roll out each piece dough into a rectangle, approximately 25 x 40 cm. Using a knife or dough divider, cut into two rectangles 25cm x 20cm. Alternatively, if you have the space, you can roll out the entire piece of dough into one rectangle 50cm x 40cm and divide into 4 equal quarters. The resulting pieces of dough, 25cm x 20cm, will be the same.
Take your filling and spread half over each of the rectangles, being careful to leave about 1.5cm border all the way round. Now roll up each rectangle carefully, running a little water along the last edge, to seal the dough. You should end up with 4 long sausages of dough. Take each one, and making sure the dough has stretched evenly all the way to the end (pull the corner gently up if it has not). Pinch the ends together (wet a little inside if they are too floury to stick). Roll the ends in your two hands until you have created a sharp point at each end. Now gently roll each one to ensure the seam is secure, then taking each end gently stretch each roll until it is about 30cm long, taking care to stretch it evenly all along the roll. The gluten you have developed should make this stretch easily achievable.
| Take one roll and shape like a cup handle, with the seam underneath. Take another and make the mirror image and place the two together on a baking tray, pinching together the two joins, both top and bottom. Now do the same for the remaining two rolls. Bear in mind, the dough hearts will double in size whilst they prove for a second time, so place on separate baking trays to give them plenty of space to grow. Cover the two hearts with cling film or a plastic bag whilst they prove. If you wish to bake the same day, leave at ambient temperature for 1.5-2 hours until they have appreciably grown in size and return slowly back to place when poked gently with your finger. If you wish to bake fresh in the morning, simply cover and leave in the fridge overnight for 8-12 hours and bake straight from the fridge (no need to bring back to room temperature). | 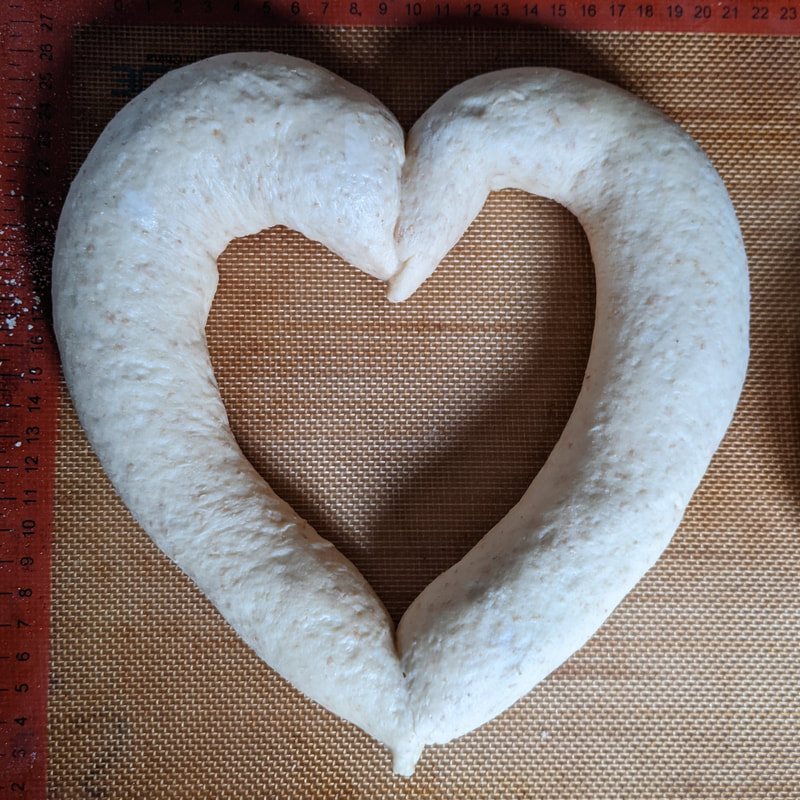 |
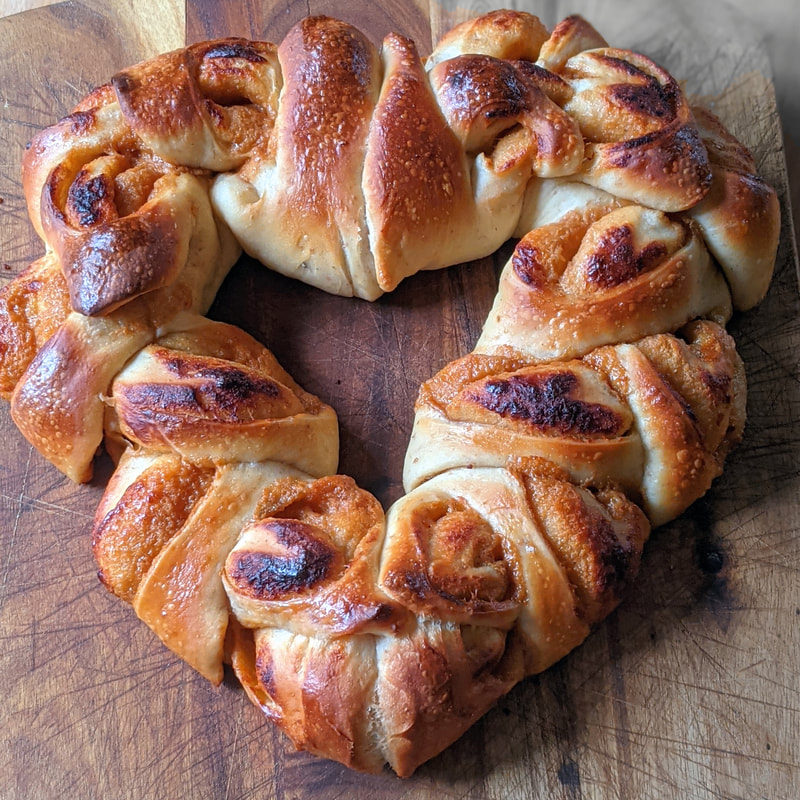
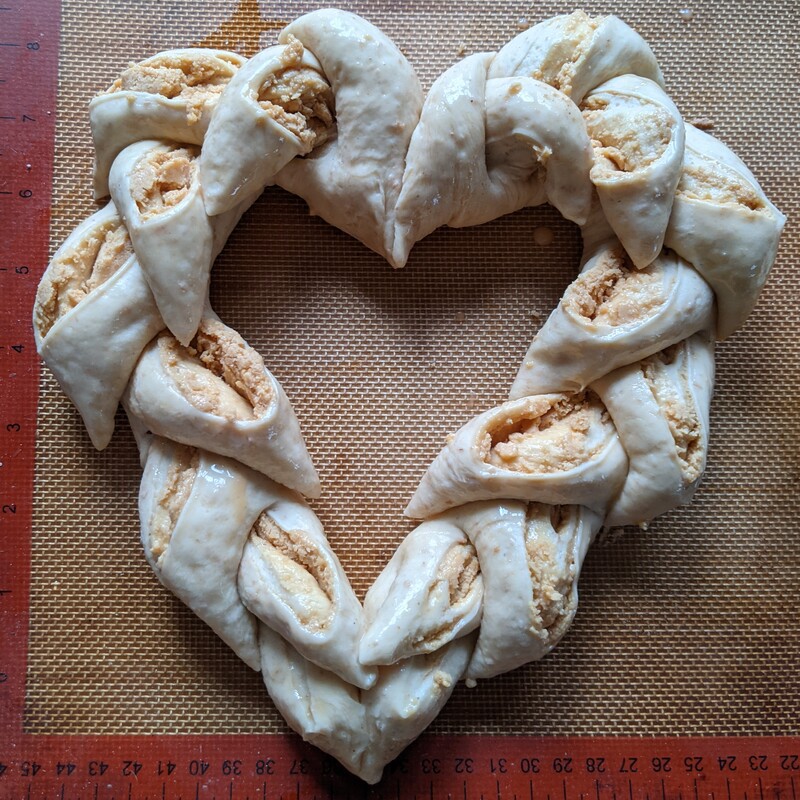 | Half an hour before you are ready to bake, preheat the oven to 220C. Then, just before you bake it is time to cut the each half of the heart, épi de blé style, with scissors. Holding the scissors very flat and snipping in line with the dough, following its curves, flip each cut alternately left then right. Finally, brush each with a little beaten egg, then place into the preheated oven. Immediately turn down the temperature of the oven and bake at 190C for about 20-25 minutes until golden brown and the centre of the dough has reached a temperature of 95C. Allow to cool on a rack. The hearts freeze well, due to fat content within the dough so you can always make ahead of time. You can re-bake straight from frozen in a hot oven for 10 mins or so, ready to tear and share whilst still warm or leave to cool once more on a rack. |
If you’re not a huge Marmite fan, you could add some chopped jalapenos with the cheddar and cream cheese instead. Or why not make a sweet cinnamon version, creaming together 150g softened butter, 100g soft brown sugar and a couple of teaspoons of ground cinnamon? Better still, make one of each!
 |
A little project for you or the kids. Or maybe you and your kids – make your own family of hedgehogs!
Kids can’t go wrong with dough. It’s doughty stuff! They can push it, pull it, tear it, thump it, drop it, throw it and it will thrive! Make this a fun activity at the weekend, or why not make it part of home-schooling when you need a break from relentless screen and book work, and tie it in with the science curriculum?
Did you know yeast is a fungus? It’s also known as sugar fungus (saccharomyces). All you need to make bread is flour, water, yeast and a little salt. Easy, huh? So easy, in fact, we’ve been doing it for thousands of years – on hot stones, in clay or iron pots, on ashes, in the ground under ashes... So, a modern oven and some ready dried yeast should make it a doddle!
To start producing the bubbles of gas to rise your bread, the yeast needs some sugar to feed on. It’s its best thing. And flour is full of it, but it’s all locked up in bigger starch molecules and the yeast can’t get to it. Once we add the water, the starch structures swell, allowing enzymes in the flour to work on the starch and break it into simple sugars. Yeast feasts on the sugar and produces carbon dioxide as a waste product. If bread was a liquid (like beer!) we’d see the bubbles rising to the surface, but in bread, it gets trapped by the stretchy gluten structure which fills like balloons within the dough.
Your job is to knead the bread to create the stretchy gluten ready to trap the gas and then wait until each ‘balloon’ has filled, so your bread is light and fluffy. Mostly, nature is going to do all the hard work for you.
All you need is some bread flour, a little salt, some ready dried yeast and some tap water. You don’t even need scales – you can cheat with a coffee mug and a teaspoon. Have fun!
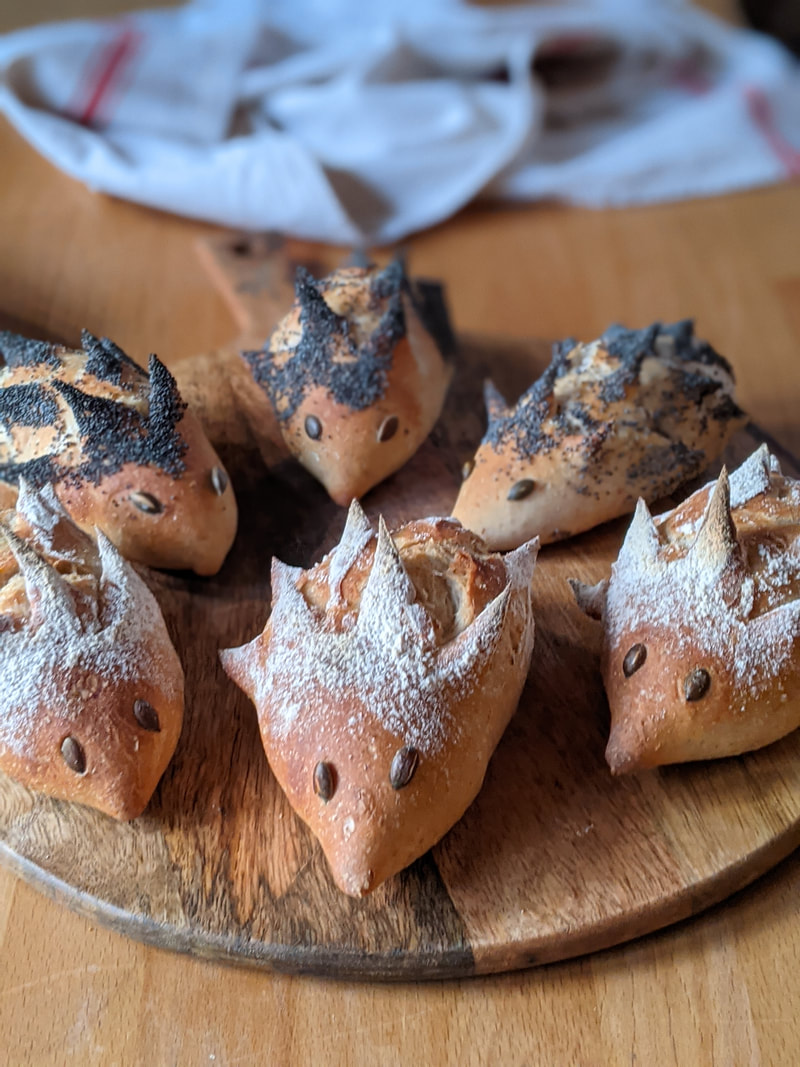
| Ingredients 750g strong white flour 450g tepid water (ie vaguely warm to the touch) 7g (one sachet) instant dried yeast 12g fine salt Or, if you don't have scales: 2 ½ x coffee mugs, loosely packed strong white flour 1 x coffee mug tepid water (full, to brim) 1 x 7g sachet fast action ready yeast 1 heaped teaspoon fine salt Method: Mix all your ingredients in a bowl until you have a rough dough and no loose flour left. Tip it out onto the counter and knead the dough for about 10 or 15 minutes until it’s smooth, elastic and stretchy. There are lots of ways to knead dough, but as long as you continuously push or pull the dough and then fold it back over itself, you’ll be developing that gluten. Once your dough is kneaded, form into a ball, put in a flour dusted bowl & cover with a cloth for about 1.5 hours until it’s doubled in size. Now remove the dough, slap it with the flat of your hand to remove all the gas before you divide it into 10—12 equal pieces of dough.  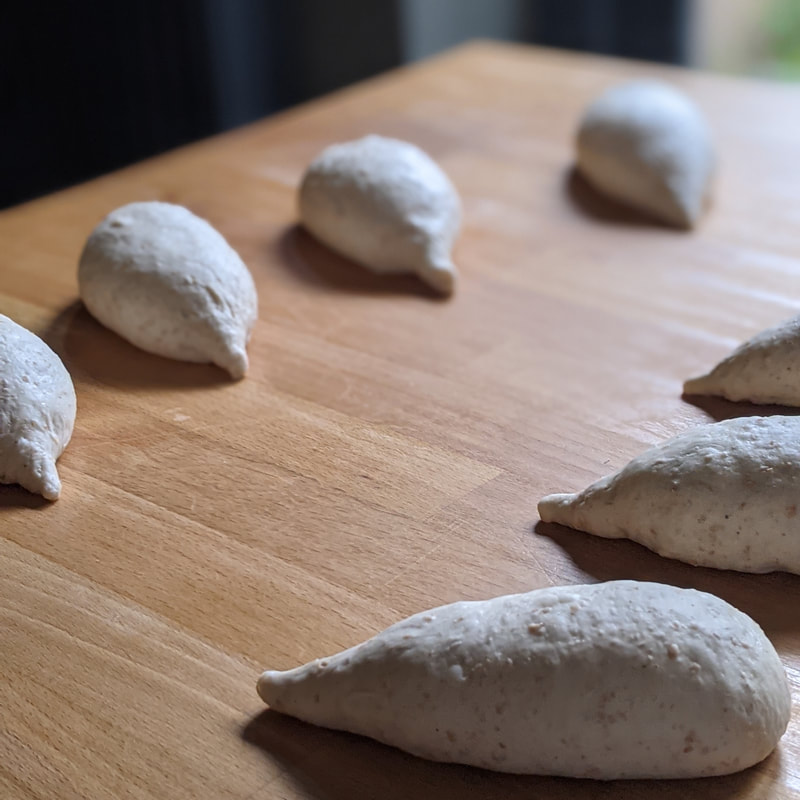 | 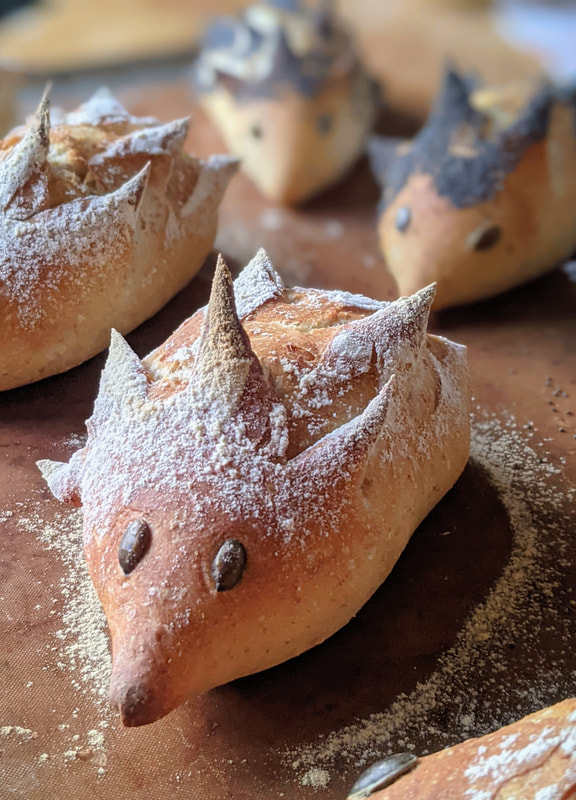 Shape each piece into a little round ball with a smooth top, taking care to squish out any bubbles that appear at this stage (plenty of time for more bubbles to grow as it proves for a second time). Now take a ball and fold over itself so you have an oval shape. Finally, roll one end to a long point for the ‘snout’ of your hedgehog. If you want to add seeds, now is the time. Dampen a cloth, roll your hedgehog’s back on the cloth, then roll it on a plate of poppy or black sesame seeds. Place each one on a baking tray, remembering to space well out as you want them to double in size. Cover again with a cloth and leave to prove for another 1.5 hours. Remember, yeast feeds more slowly if it's cold, so give it a little longer on a cold day or if your kitchen is cool. Never be tempted to hurry things along in an airing cupboard. They're usually much too warm! The yeast will be happy if you just let it take its time. 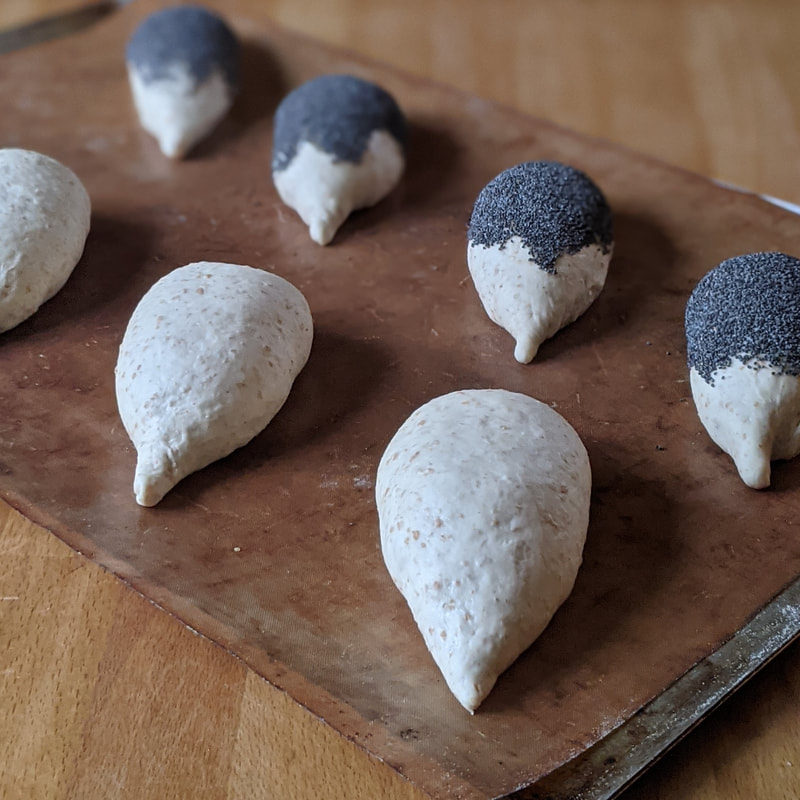 |
Bread is baked in a really hot oven, so make sure you preheat your oven to 240C at least 20 minutes before you need to use it. Perhaps set a timer for 1 hour after you have shaped your hedgehogs to remind you to turn it on.
When your little rolls are ready, they will have roughly doubled in size and when you gently press the dough it will bounce slowly back. If you wish to, you can add a couple of pumpkin seeds or currants for eyes. For those you haven’t covered in seeds, you can sprinkle a little flour on their backs.
When your little rolls are ready, they will have roughly doubled in size and when you gently press the dough it will bounce slowly back. If you wish to, you can add a couple of pumpkin seeds or currants for eyes. For those you haven’t covered in seeds, you can sprinkle a little flour on their backs.
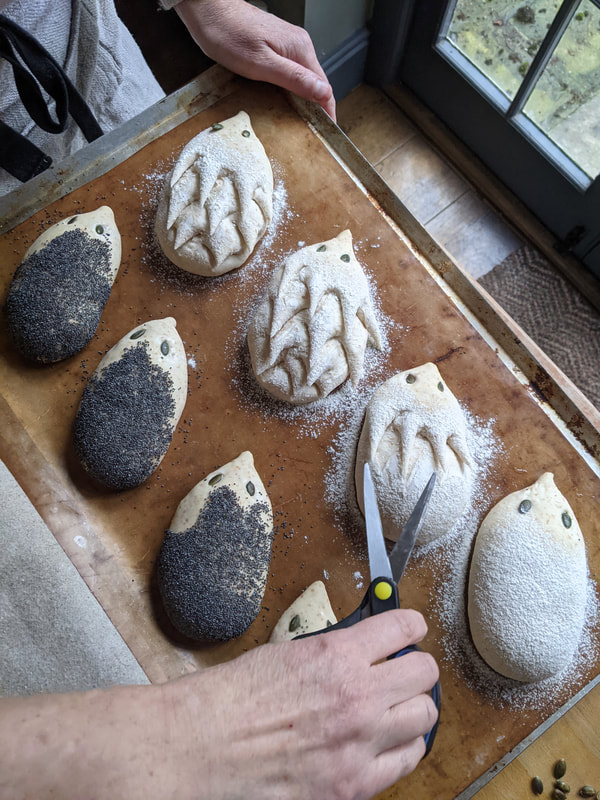 | 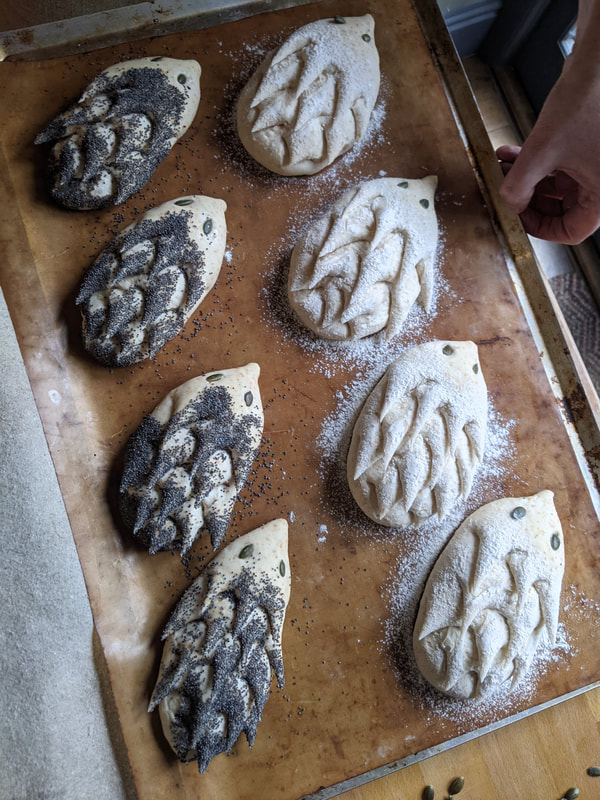 |
Before they go into the oven, we have to cut the hedgehogs’ ‘spikes’. To do this, hold your scissors almost horizontally and cut row upon row of spikes. You will cut them flat, but they will spike up as the dough springs up in the oven.
As the tray of rolls go into the oven, throw half an eggcup of water onto the bottom of the oven to provide some steam. Close the oven door and turn the temperature down to 220C and bake for 15-20 minutes until golden brown. The longer the bake the crisper the crust, so feel free to leave them in longer – just watch the tips of your hedgehogs’ spines don’t burn!
Allow to cool on a rack – a clean grill pan will do as long as air can circulate and allow the steam to escape from the roll or you’ll find the bottoms will be a bit soft and soggy.
Once cool, you can bag up (and freeze) any you don’t want straight away.
How will you eat yours? Tear off the spikes and dip into something delicious or cut open and fill with your favourite sandwich filling. How about hedgehog hotdogs? Have fun and happy baking!
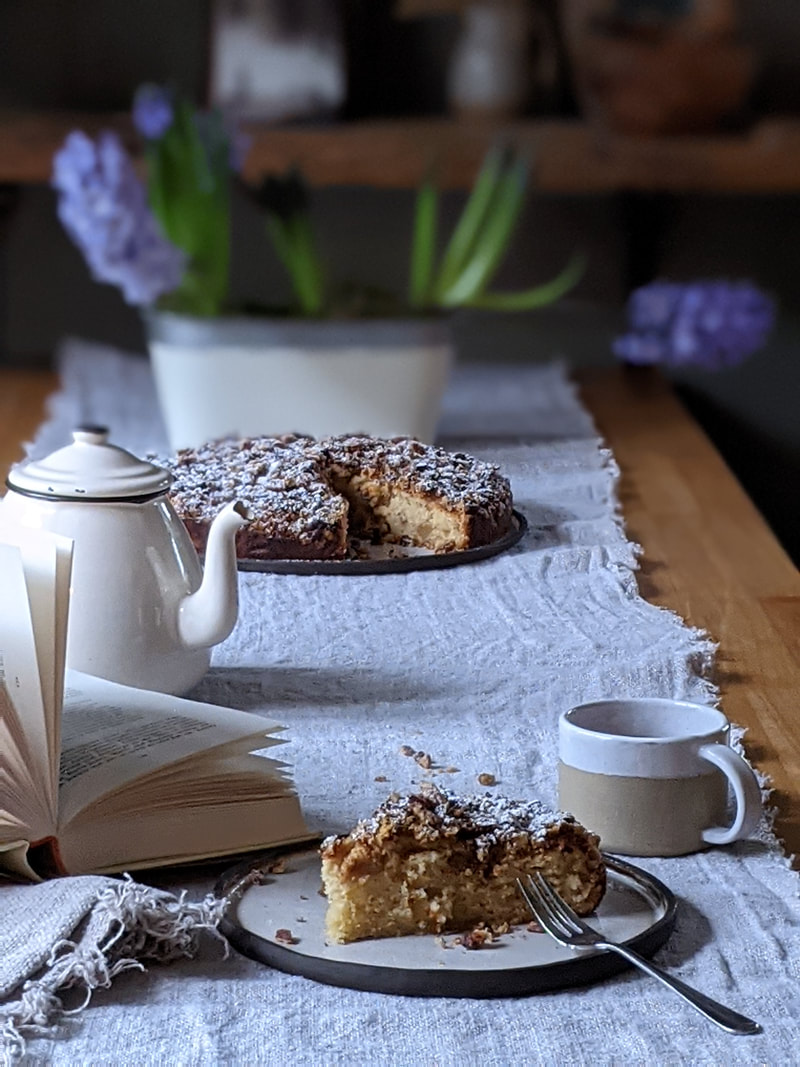
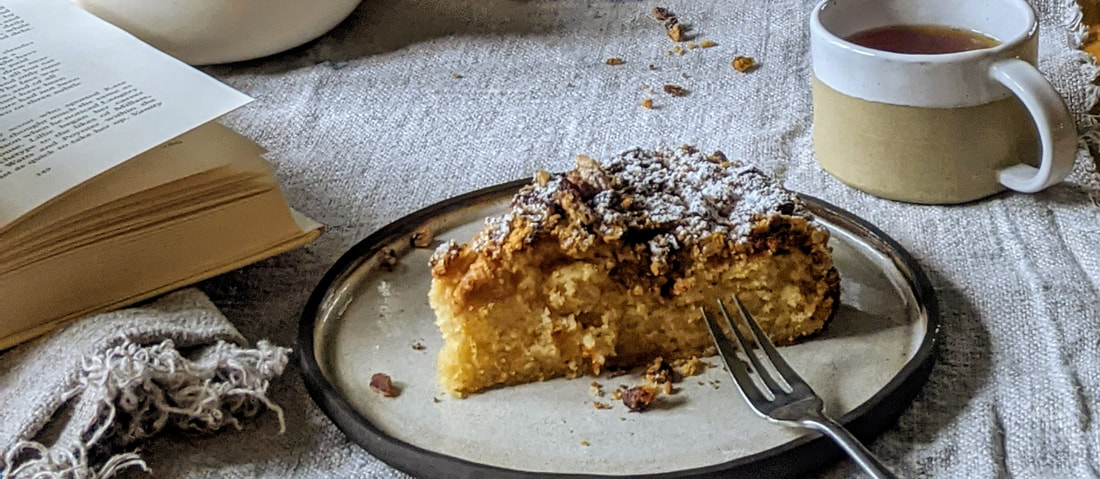
Apple cake with streusel topping
Delicious any time of year, this recipe was dreamt up in Winter in remembrance of snowy days during a relentless grey and dreary January. Each year, for many years, our little family has visited a favourite restaurant in a cosy wooden cabin, usually buried deep in snow and hidden half from view, on the French/Italian border. We usually steal a march on the lunchtime trade by dropping by late morning for a warming drink and a slice of the best apple cake I have ever tasted. We take our treasure and savour it en plein air, under the bluest of blue skies. In lieu of that for now, and hankering as I am for those bright, sunny, carefree days, I have baked my own version. It's close but I'm not sure anything will be quite up to the memory (it really is the BEST cake!). Perhaps I just need the snow under my feet, the warmth of the sun on my face and my lungs full of the that crisp, clean Alpine air...
Ingredients:
(Makes one round cake, 23cm-27cm diameter, or 20cm-23cm square tin )
For the caramelised apples:
3 dessert apples, sharp and crisp (eg English Cox), peeled, cored and cut into chunks
20g butter
20g brown sugar
For the streusel topping:
50g salted butter, room temperature
75g self-raising flour
50g demerara sugar
75g pecans, roughly chopped
For the cake batter:
250g self-raising flour
1 tsp baking powder
½ tsp fine sea salt
250g golden caster sugar
200g unsalted butter, softened
3 large eggs
1 tsp vanilla bean paste (or extract)
150g Greek yoghurt
Zest ½ lemon
| Prepare your chosen round or square cake tin by lining and greasing well. A smaller tin will produce a taller cake, but keep within the size guidelines. Preheat your oven to 350F/180C (160C fan). First prepare your apples, by melting the 20g butter and sugar together in heavy bottomed pan and allow to caramelise. Add your chopped apples, coat in the caramel and cook on a medium heat for 5-6 minutes, turning occasionally. Transfer to a plate and leave to cool. Now prepare your crumble topping: rub the room temperature butter into the flour lightly with your fingertips. You don’t need to ensure even ‘breadcrumb’ texture as you want a varied crumbly texture. Add the demerara sugar and mix evenly. Set to one side with the chopped pecans. To make the cake batter, sift together the salt, baking powder and flour. In another bowl, cream your sugar and butter together until pale and fluffy – 4-5 minutes. | 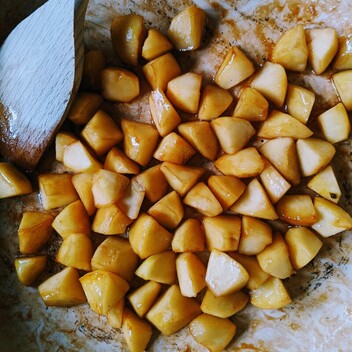 |
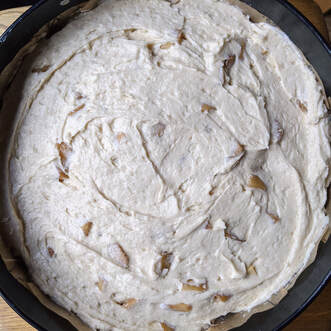 Sprinkle the chopped pecans over the top and, lastly, the streusel topping. Place on the middle shelf of the oven and bake for 50-60 minutes. The cake will be cooked when the top is firm and a skewer comes out clean. Or, better still, use a probe thermometer. The cake will be cooked when the thermometer reads around 96C-98C. If you bake a cake to temperatures beyond this the moisture will be start to be lost and your cake will begin to dry out. When cooked, remove the cake from the oven but leave in the tin for 10 minutes or so, before placing on a wire rack to cool. Delicious warm or cold, and wonderful with a dollop of sour cream or Greek yoghurt. Pour yourself a cup of tea, find a good book and just take five! | Now whisk your eggs together and gradually incorporate into your creamed butter mix. If you mix in 5 or 6 additions they egg shouldn’t curdle, but don’t panic if you add a little too quickly and the mix does separate a little. All will be well! Whisk in your Greek yoghurt, lemon zest and vanilla until smoothly incorporated. Now switch to a metal spoon and gently fold in your remaining dry ingredients about a quarter at a time, working as little as possible to establish a homogenous mix. If the mix seems a little too stiff, you can let down the mixture by adding a tablespoon or two of milk. This may happen if your Greek yoghurt is particularly thick – the texture varies greatly from brand to brand, or even batch to batch! Finally, gently fold in your cooled caramelised apples and pour/spoon the batter into your prepared tin. 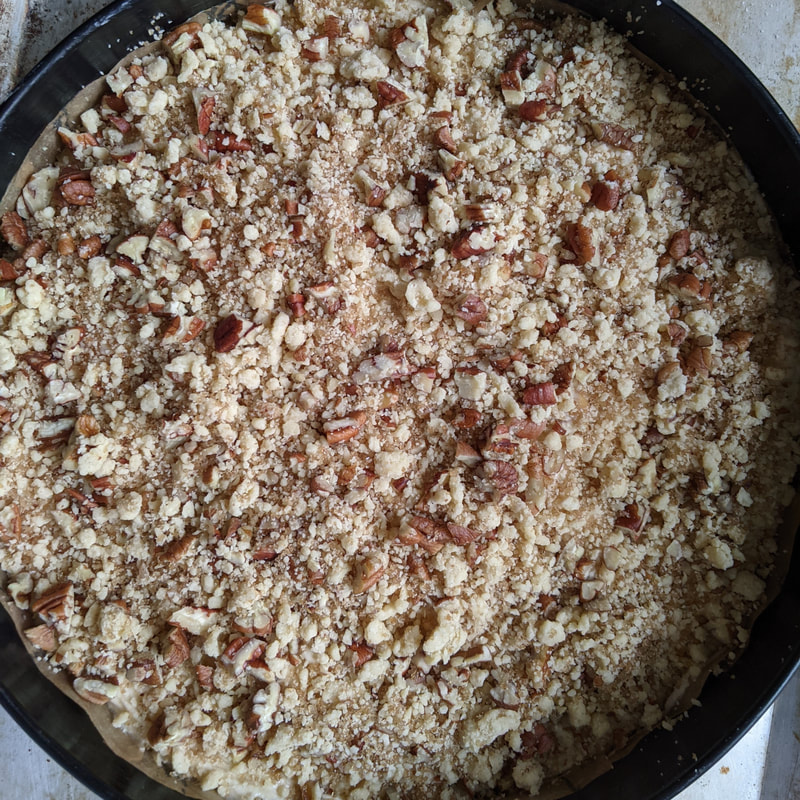 |
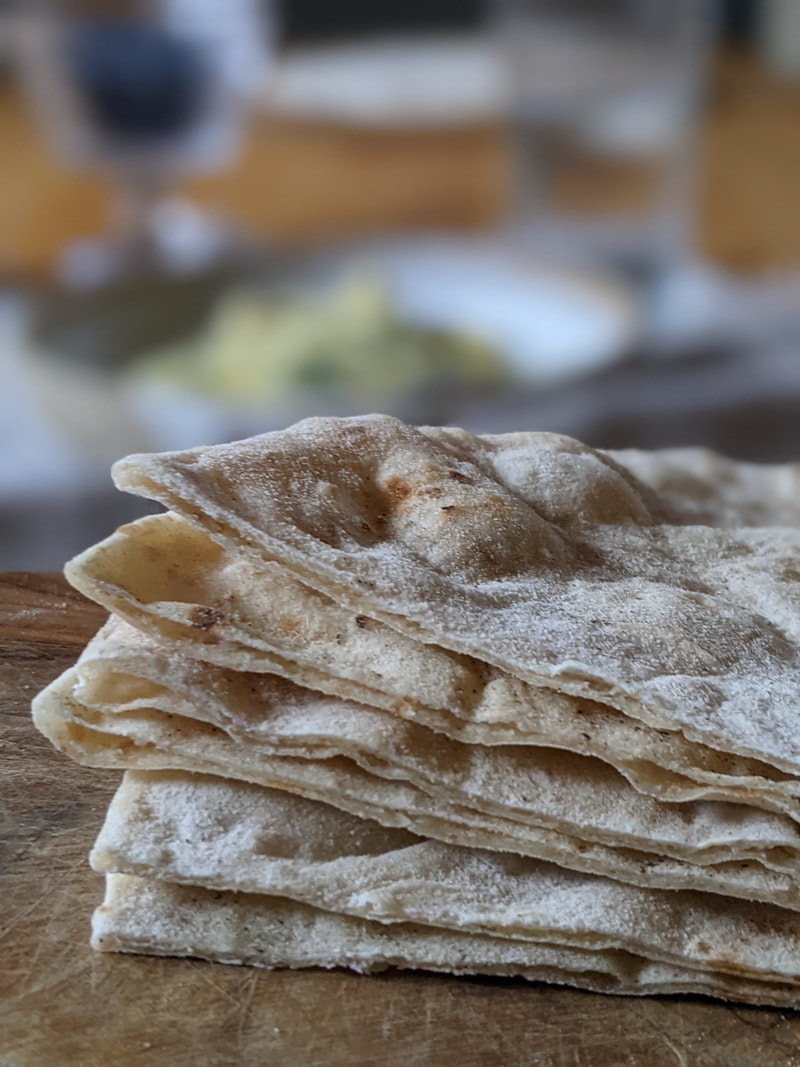
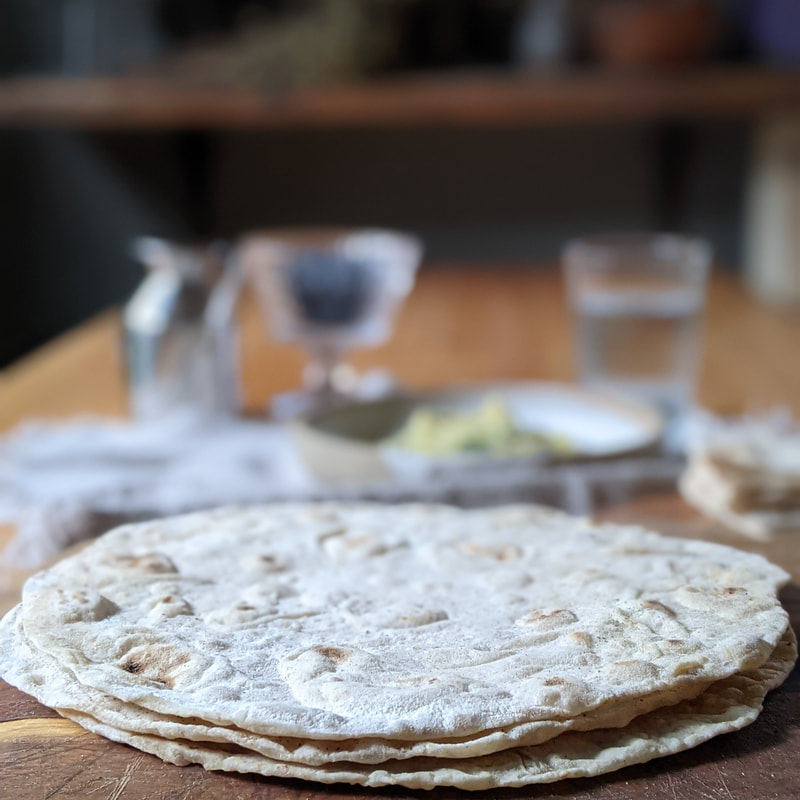
Flour tortillas
A quick, easy and versatile flat bread, the tortilla can be used for wraps, dips, quesadillas etc. They can be rustled up for an emergency lunch or supper without planning ahead of time which make them super useful when you feel like you're feeding the five thousand and really can't face another trip to the shops! No need for fancy equipment like a tortilla press - these will be easily rolled with a rolling pin as the wheat flour produces an elastic dough. Tortilla presses are used for traditional corn tortillas which are naturally gluten free and have no such elasticity.
Feel free to use all plain flour if you have no wholemeal in the cupboard.
Finally, for best results use lard (or vegetable shortening) but you can use butter if you don't have any to hand.
We like to use up old sourdough starter in our bakery recipe, but if you don't keep a starter, replace the starter with 75g of extra water plus 75g of extra white flour. This is an almost instant recipe — ready and baked in little more than half an hour, but you can keep the dough wrapped in the fridge for 2-3 days. It is not strictly unleavened, as we use a little baking powder which supplies a little lift on the griddle, giving a lighter, almost flakier, layered tortilla.
Ingredients:
(Makes 6 tortillas)
200g plain flour
1 tsp baking powder
1/2 tsp fine sea salt
15g lard (or vegetable shortening)
160g water
150g liquid starter (unrefreshed, but not too acidic. Ideally, 2-3 days old)*
*or substitute 75g flour + 75g water
| Method: Sift together the salt, baking powder and flour, then rub in the lard or vegetable shortening until you have breadcrumb-like texture. Add the water and mix into a dough using a dough scraper. Turn out onto your counter and knead for a few minutes until you have a smooth and elastic dough. (Alternatively throw into a mixer with a dough hook for a few minutes). Wrap and leave to rest for 20-30 minutes for the gluten to relax before dividing your dough into six equal pieces (approx. 85g), roll into little balls and cover with a cloth whilst you roll individual ones out. | 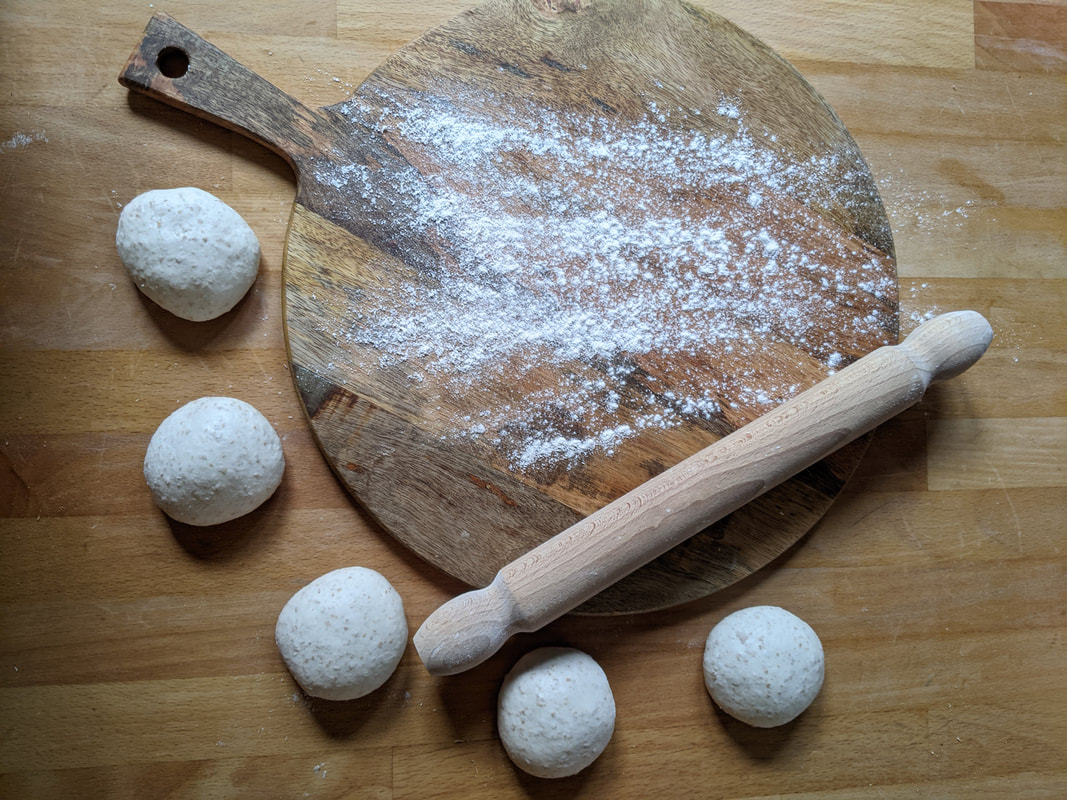 |
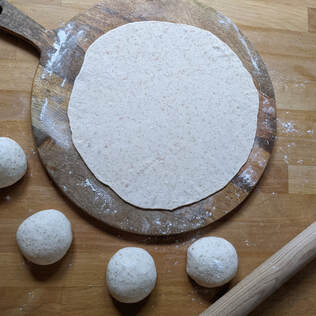 The tortilla is ready to turn when you see it blistering all over (about 30-45 seconds), flip and bake on the other side for another 30 seconds or so. If you over-bake, the dough will begin to crisp. Practise will make perfect! You can stack the tortillas as you bake each one, but cover with a cloth each time, to ensure they keep the steam in and remain soft and pliable as they cool. The cooked tortillas can be wrapped when cool and kept for several days, or you can divide the dough, keep some in the fridge for 2-3 days and cook fresh when needed. | Flour your counter well then, using a floured rolling pin, roll each piece into a thin disc, approximately 25cm in diameter and ensure they are well-floured as you stack them ready for baking. Ideally, make two piles of three, to prevent them sticking together. This dough is very soft so should easily roll, but you may need to be diligent with keeping both your counter and the rolling pin floured. Turning your tortilla over regularly will help keep it from sticking. Once you’ve practised a couple of times, it should only tale a minute or so to roll out each one. Before baking, prepare your griddle or heavy skillet by ensuring it is very hot before you start cooking. Have a plate or steam basket ready to stack them as each comes out of the pan and a clean tea towel ready to cover them and keep them soft. Each tortilla should only take about a minute or so in the pan — no need for oil. 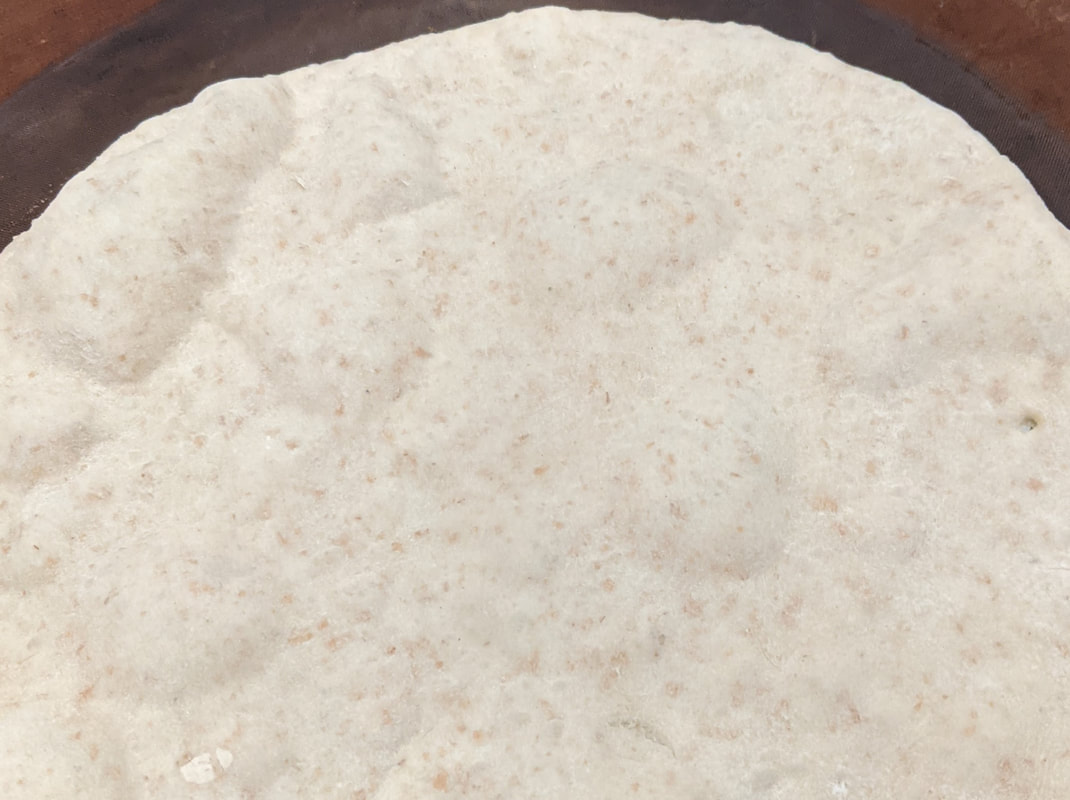 |
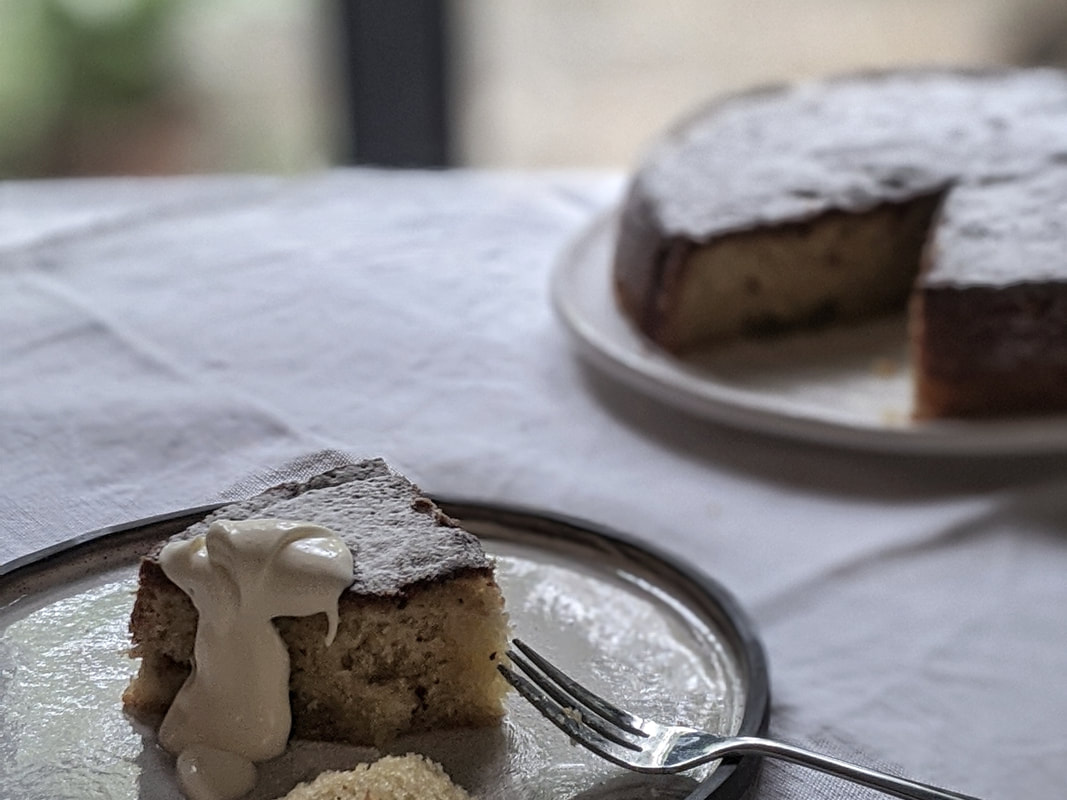
This is fast becoming one of my favourite go-to cake recipes. I love the flavour and tender crumb that comes from the addition of sour cream in a cake batter. We can also use a little less butter as a consequence. You can play around with the quantity of ground almonds you use, so don’t panic if you don’t quite have enough – just substitute the missing almonds with more flour. Ground almonds always produce a deliciously moist cake with great keeping qualities.
Here, I wanted to use the very last of my greengages, but any firm fruit would do. Try to avoid very soft and ripe fruit or you will find the base of your cake may become a little soggy. If that should happen, you’ll have a very happy accident: just serve warm with some vanilla ice cream or crème fraiche and it becomes a delicious pudding!
Here, I wanted to use the very last of my greengages, but any firm fruit would do. Try to avoid very soft and ripe fruit or you will find the base of your cake may become a little soggy. If that should happen, you’ll have a very happy accident: just serve warm with some vanilla ice cream or crème fraiche and it becomes a delicious pudding!
Ingredients
Ground almonds 100g
Plain flour 75g
Baking powder 1 tsp
Bicarb of soda ¼ tsp
Vanilla essence 1 tsp
Sour cream 60ml (= 4 tbsp)
Caster sugar 150g
Butter, softened 125g
3 eggs
Approx 10-12 firm greengages or plums
Icing sugar for dusting
You will need one 9” (23cm) spring-form cake tin, greased and lined.
Preheat your oven to 180°C/160°C fan/350°F
Method
For ease and convenience, you can make this cake batter in your mixer, using the all-in-one method, but I prefer to make the extra effort to separate my eggs and fold in my egg whites.
First sieve together your flour, baking powder and bicarb of soda then add your ground almonds and set aside. Next beat together your sugar and softened butter until light and creamy. Add your vanilla essence and sour cream and beat for a few more seconds.
Now separate your eggs. Place the yolks in your creamed butter and combine. With a clean whisk, beat the egg whites until you have stiff peaks (ensure both whisk and bowl are completely fat/oil/yolk free).
Finally, you can combine the dry ingredients, the egg whites and butter cream. Do this in thirds, folding first a third of the egg whites into the butter cream mixture, then a third of the almonds/flour. Keep alternating and gently folding, trying to retain much of the light airiness provided by the egg whites as you go, until you have incorporated all the ingredients and have a well-combined, light cake batter.
Pour/spoon cake mixture into your lined and greased cake tin. On top, arrange your halved, de-stoned fruit (either way up – the fruit will sink lower), and place in the oven and bake for 50-60mins.
| Your cake will be cooked when a skewer comes out clean and the cake has shrunk from the sides. Ideally, use a probe thermometer. The cake will be perfectly cooked between 96°C and 99°C. Below, 96°C, the cake will not be quite cooked on the bottom, where it is moistest, and above 100°C, the moisture in the cake will begin to evaporate and your cake will be drier than need be. Release from the tin and allow to cool on a rack. When cool, dust with icing sugar. You can serve warm as a pudding, or cold as tea or coffee cake. Or, equally, you can serve as ‘that was a great workout’ cake or ‘I miss my friends’ cake or ‘great to see you, here’s to friendship’ cake or ‘I wanted to impress my friends, but I’ve just impressed myself’ cake or simply ‘this is just for me, I need impress no one’ cake. Personally, I need no excuse for cake. Store in a cake tin only when completely cooled. Keep in a cool, dry place. | 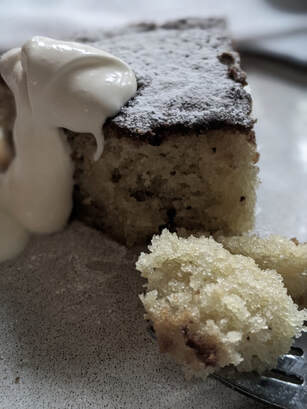 |
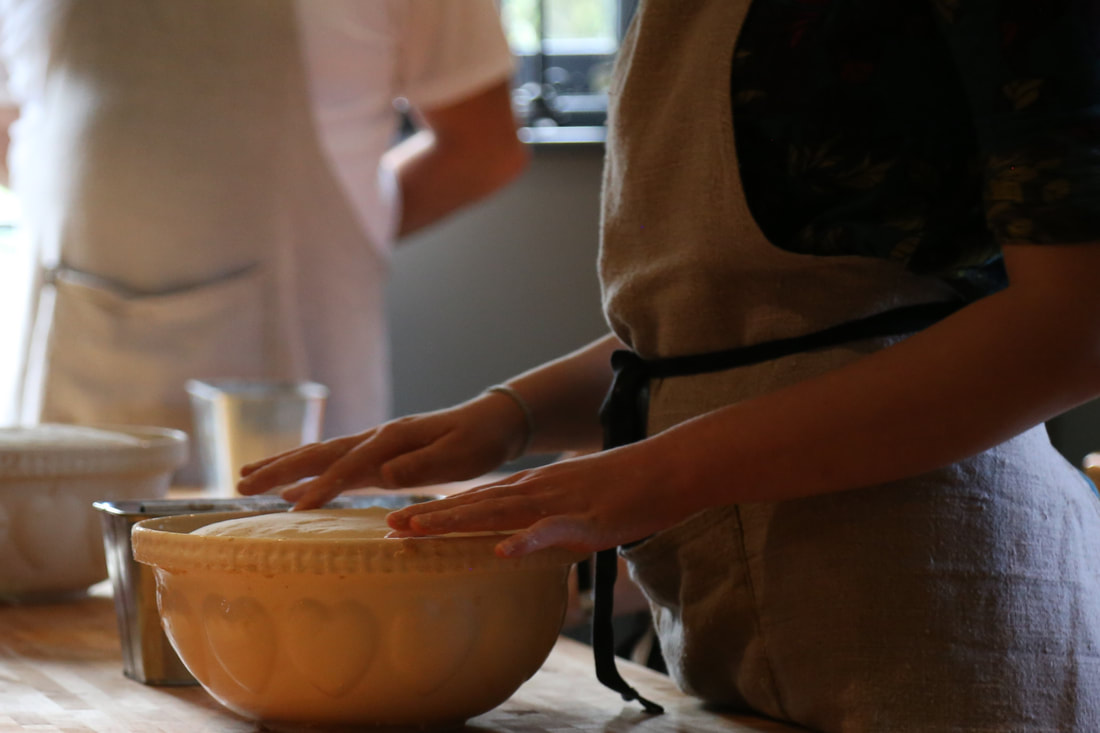
Finally, as lockdown regulations began to ease and the government allowed the gradual opening up of the hospitality sector, we have been able to recommence our workshops. Admittedly, just before the Summer recess, but we are thrilled to be back doing what we love.
New protocols are in place to keep staff and students safe, and classes are much reduced in size going forward. This will remain the case for the rest of this year and will be reviewed going into next. Our biggest worry has been one that is common to the hospitality sector in general, but one particularly pertinent to our way of working as we already keep to small class sizes. How would our relaxed atmosphere be affected by reduced numbers and extra ‘procedure’?
We encouraged our first post-lockdown class to share their thoughts with us and were delighted to be able to implement a few tweaks to make our students feel more relaxed and comfortable. We’ll be as flexible as we can and will be responsive to any necessary changes going forward, but we hope we now have the right balance: a fun and relaxed working atmosphere paired with with sensible protocols and rigorous hygiene. We’ve also thrown open our windows and doors and, for as long as we are able, we are enjoying taking breaks and lunches outside, forever grateful for our glorious cottage garden that can accommodate us all.
Here is some feedback from 2 students on our most recent workshop. We’re so grateful to them for taking the time to share their thoughts and for their fulsome reviews. We want to share them with you to show how we are embracing our ‘new normal’ and still having fun!
Ultimately, we do what we love. We want you to love it too!
"I took photos of the bread yesterday evening and couldn't quite believe that I had made them! Your tuition was fantastic...I felt very confident attending White Cottage Bakery; your communication regarding the class size beforehand reassured me that the current public health guidelines were being adhered to.
On arrival, you and [your staff] were very welcoming and I felt comfortable immediately. There was a lovely relaxed atmosphere. You managed to strike a perfect balance between vigilance with the required sanitation and making us feel at home and relaxed. That's difficult, as being responsible for any kind of gathering in the current climate could make a person anxious!
The practical help and explanations were great; you have an encouraging manner, which made us all believe ourselves capable (this is the battle won in any classroom!!). Lunch was delicious and the change in format to a single platter each did not impact on the pleasurable experience. Many thanks again for such a great day. I will be recommending your course!"
"What a lovely day we all had, blessed with some great participants and so enjoyed your course. It was the perfect blend of being well structured and informative as well as fun and relaxing. I came away feeling confident with what we had learnt and inspired to do more. We ate the first loaf having a drink in the garden and the second one for breakfast this morning and they were both delicious and so rewarding to have made them by hand. Thank you and your team so much for looking after us so well, it was such a treat after the lockdown and I couldn't have asked for more.
Please let me have any details of future courses, I will check your website, but also of the Tuscan cookery week which sounds idyllic. I am sure you will be seeing more [of us]."
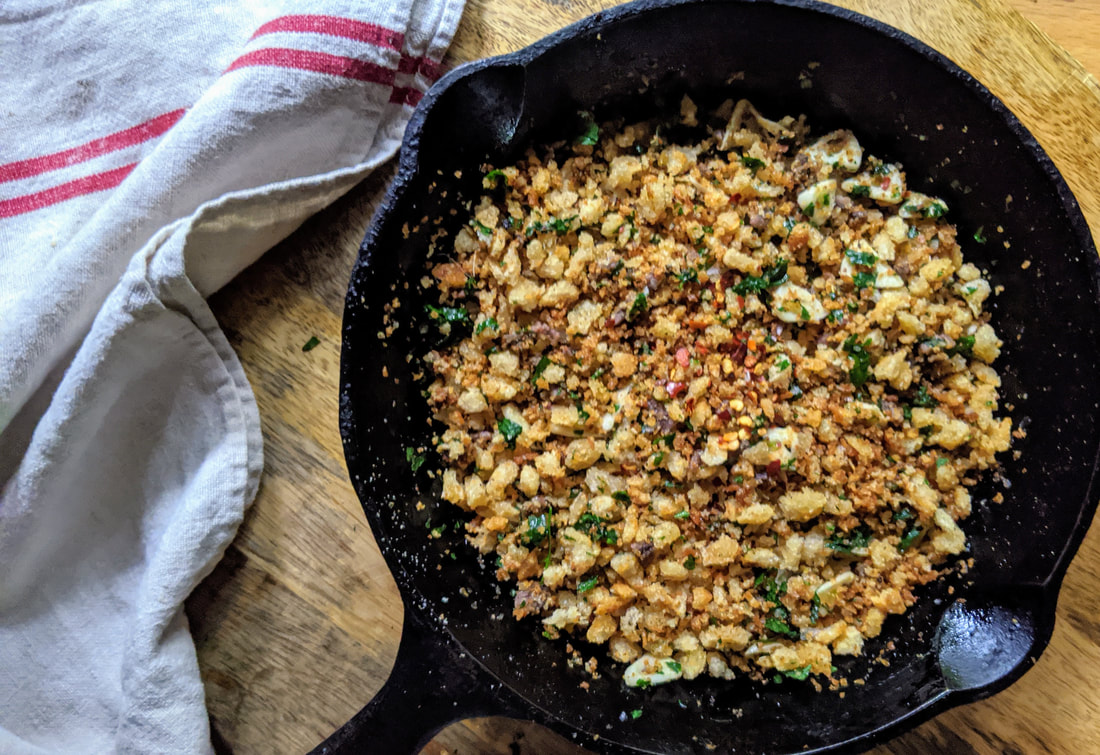
Pangrattato - the wonderful Italian name for the most basic of ingredients. With a little effort, it transforms any simple pasta dish into something divine. A great way to use up old breadcrumbs, it is quick and easy to prepare, especially if, like me, you keep a ready-tub of breadcrumbs in your freezer by simply whizzing up any stale old ends of bread you may have as you go along.
Pangrattato literally means ‘grated bread’ but when the crumbs are fried in olive oil, together with delicious savoury ingredients such as garlic, herbs, and a few chilli flakes the whole is magical and so much more than the sum of its parts.
This particular recipe throws everything you’ve got at it to provide a huge umami hit. Perfect for a simple dish, such as pasta all’aglio, olio e peperoncino (garlic, oil and chilli) or pasta al pomodoro (tomato). However, if your pasta dish is more complex, packing more flavours, you could make a simpler version with just a little garlic, seasoning, some fresh herbs and maybe a hint of lemon zest to finish off the dish.
If I have any leftover, I’ll reheat the next day to crisp it up and scatter over something like a simple tomato salad. Not a crumb is wasted!
| Ingredients: 50g fresh (or frozen) breadcrumbs 2 cloves garlic, sliced or finely chopped 2 tbsp olive oil Pinch chilli flakes 2-3 anchovy fillets, finely chopped Generous pinch sea salt flakes Freshly ground black pepper Handful chopped parsley or mixed soft fresh herbs | 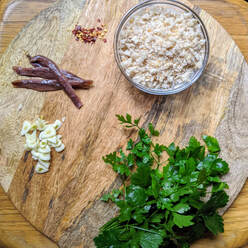 |
| Method: Heat the olive oil in a skillet and then add the breadcrumbs, coat and fry for 2-3 minutes over a medium high heat. Now add the garlic and fry for another couple of minutes or so – I like to slice mine about 1mm thick, but if you prefer smaller pieces, either chop finely or pass through a garlic press. Now add the rest of the ingredients, stir well and fry for another minute or so until the pangrattato is fragrant and golden. | 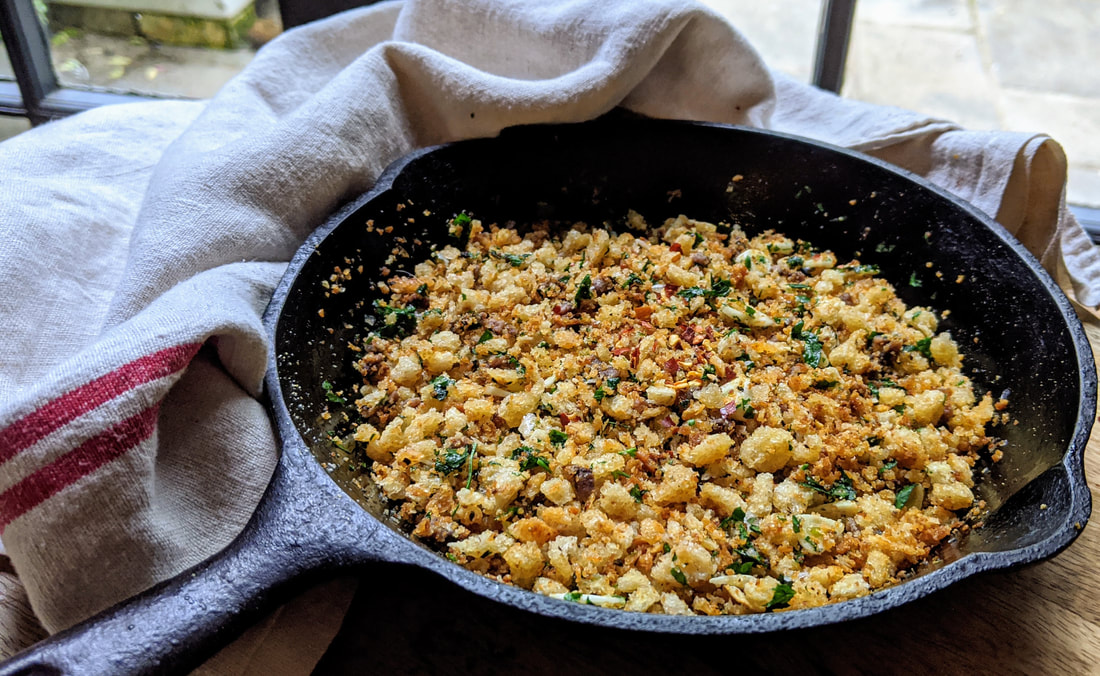 |
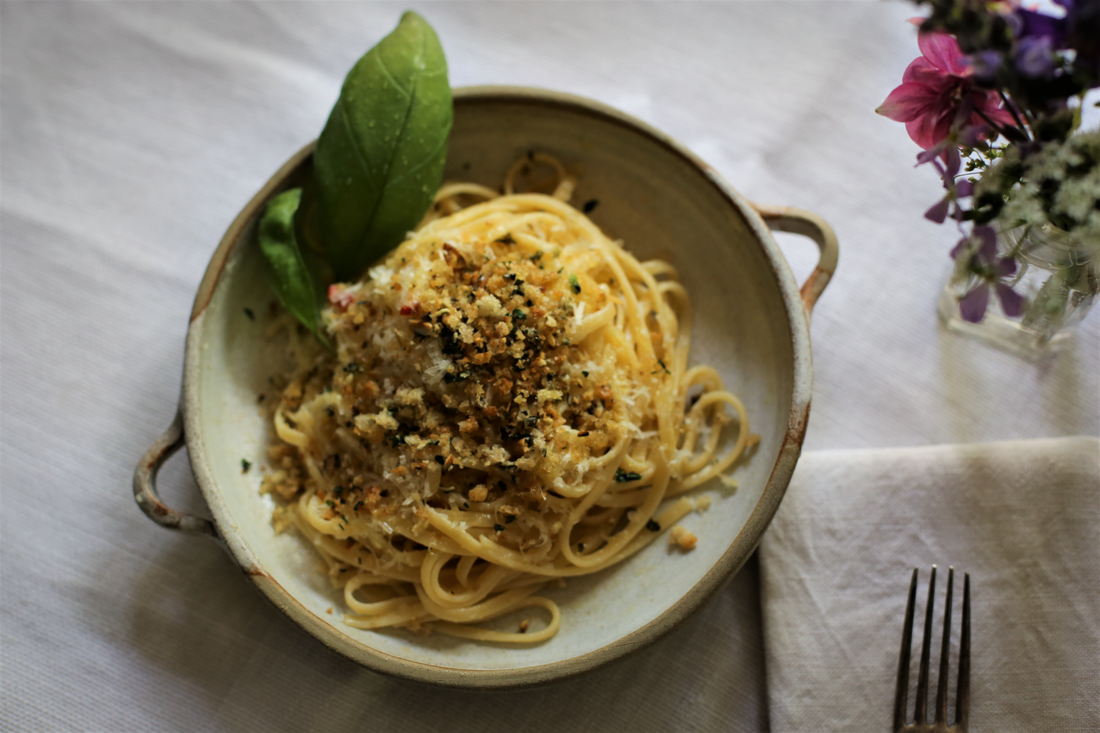 | Sprinkle over your final dish at the last minute to maintain its crisp golden texture. Why not check out our recipes for fresh sourdough pasta and sourdough ravioli with ricotta and foraged herbs... |

Our workshops are run by award-winning sourdough baker Helen Underwood.
Categories
All
Awards & Press
Events
News
Recipes
Specials
Archives
November 2023
April 2023
February 2021
January 2021
August 2020
July 2020
June 2020
May 2020
April 2020
March 2020
October 2019
September 2019
April 2019
March 2019
February 2019
January 2019
April 2018
March 2018
December 2017
October 2017
September 2017
April 2017
February 2017
January 2017
November 2016
October 2016
September 2016
August 2016